Controlling home server over IPMI from an iPhone via Apple Home
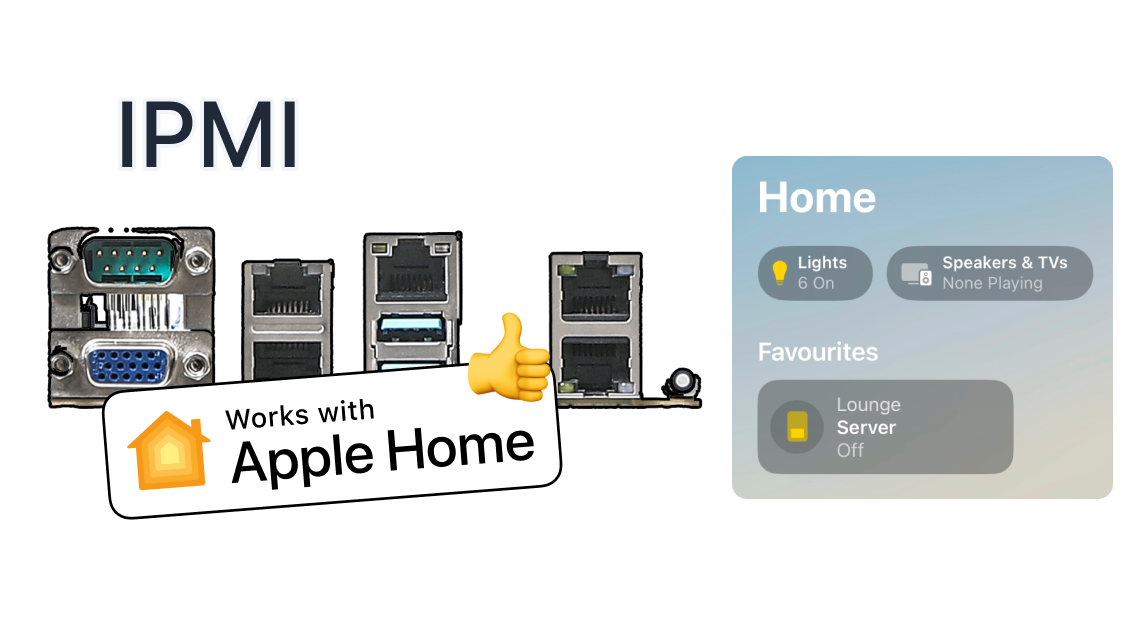
Naturally, my motherboard, much like any other, didn't come with the fancy "Works with Apple Home" sticker. However, through the power of friendship open source and Home Assistant anything is possible, see for yourself!
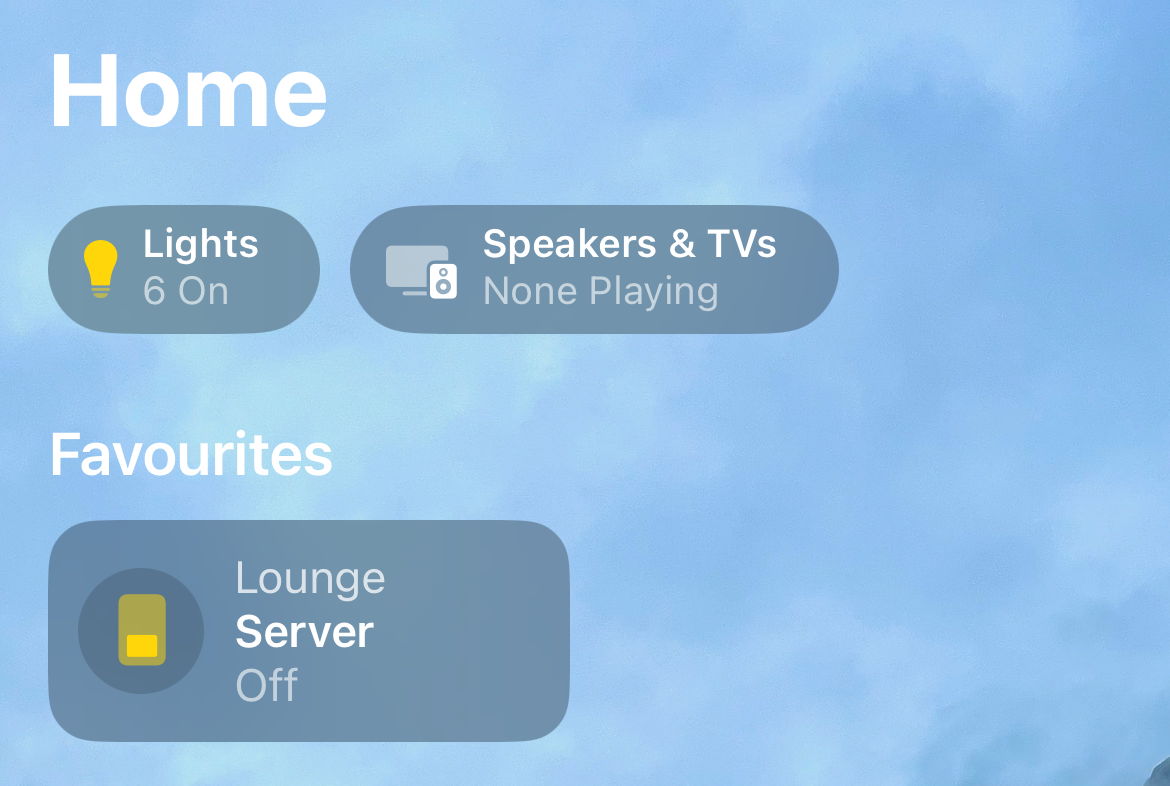
Video showing a server being turned on over IPMI from Apple Home from iPhone Control Centre.
I will assume some prior knowledge about home automation, docker and general IT literacy for this guide. Feel free to look up anything that's not clear - It's a well documented area, or ask away in the comments.
Overview
My setup consists of the following notable items:
- Home Server - a Node 804 box with an X570D4U-2L2T/BCM motherboard with 10Gb networking and IPMI connectivity, connected over to the switch. I don't have it on 24/7, hence the desire to be able to easily toggle it's power state.
- Raspberry Pi - an always-on small RPI with docker-compose running various home automations and services like Caddy, Pi-hole, Home Assistant and so on.
- Apple Home Hub - in my case it's the Apple TV 4K (gen2) that interacts with the HomeKit Bridge Integration in Home Assistant.
To my knowledge, you need an Apple Home Hub of some sort, this setup will not work without some Apple device that can operate as a hub. Check here for the list of the devices tested. The best ones are HomePod, HomePod Mini and Apple TV 4k Gen 2 over Ethernet.
The Flow
Before hitting the IPMI interface the data is flowing through 3 other services that we're going to set up as part of this guide. They are:
- Apple Home Hub, paired to Home Assistant (see below).
- Home Assistant itself, complete with home-assistant-ipmi and HomeKit Bridge which allows us to expose most entities to Apple Home via the Hub.
- ipmi-server, a standalone docker container that delivers a Symfony router that essentially wraps ipmitool and delivers responses over JSON.
In essence, the communication is initiated via the Apple Hub (either local network or Internet, depending on your config), goes through to HomeKit Bridge that's added to the Home Assistant, which in turn activates a switch exposed by home-assistant-ipmi that contacts the ipmi-server container over a shared Docker network which, in turn, sends the signal using ipmitool through the bridge network on RPI to the IPMI interface on the same network. Easy, right?

The Setup
Docker
We will be using a shared network for parts of this setup, so let's get that out of the way first.
I'm assuming that you have an otherwise functional docker setup and know your host machine IP address and can reach both via the browser and ssh.
Create a new docker network
docker network create shared_netYou can name it any way you want, for me it's caddy_net as I'm using Caddy but we won't be needing a reverse proxy for this to work anyways. The only reason we're doing this is for automatic DNS resolution between containers. You can read more here.
Home Assistant
We're going to be installing Home Assistant in a container, which is well described in the manual. This locks us out of an important Home Assistant feature: Add-ons, which are essentially docker containers within Home Assistant OS and Supervised installations. That's not too bad as we can circumvent this ourselves.
Docker Compose
This is the file structure for the Home Assistant docker container we'll be setting up.
/home/
└── username/
    └── docker/
        └── home_assistant/
            ├── 🗁 home_assistant_config/ (will be created automatically)
            └── 🗋 docker-compose.yml
Navigate to the home directory via cd $home , create the docker folder via mkdir docker , navigate there and create another folder cd docker, mkdir home_assistant and finally navigate there and create docker-compose.yml: cd home_asssitant and touch docker-compose.yml .
services:

  home_assistant:
    image: "ghcr.io/home-assistant/home-assistant:2024.1"
    container_name: home_assistant
    hostname: home_assistant
    restart: unless-stopped

    network_mode: host # This can be replaced with a macvlan solution. If you remove it completely won't be able to discover other devices on the network automatically
    privileged: true

    volumes:
      - ./home_assistant_config:/config
      - /etc/localtime:/etc/localtime:ro
      - /run/dbus:/run/dbus:ro

    ports:
      - "8123:8123"

networks:
  default:
    name: shared_net
    external: true
If you don't want to use host network mode (using macvlan)
It's possible that, like myself, you're not too comfortable with exposing your entire host machine network to Home Assistant. That's understandable, but without doing so we'll lose out on any auto-discovery and would be left with manually exposing devices on the network.
It's possible to circumvent that by creating what's known as a macvlan network - essentially our Docker container with Home Assistant will get it's own network adapter and will be recognised as a standalone device on the network, as well as losing implicit connectivity to the host machine. Credit goes to @CM000n from Home Assistant forums for this insightful general rundown of how to set up macvlan and how it works. Below you'll find a bit more detailed guide.
The docker-compose.yml will look slightly differently:
services:

  home_assistant:
    image: "ghcr.io/home-assistant/home-assistant:2024.1"
    container_name: home_assistant
    hostname: home_assistant
    restart: unless-stopped
    privileged: true

    volumes:
      ...

    ports:
      - "8123:8123"

    networks:
      default: {}
      home_assistant_macvlan:
        ipv4_address: 192.168.1.209

networks:
  default:
    name: shared_net
    external: true

  home_assistant_macvlan:
    external: true
You can see that we have entirely removed network_mode: host and added the networks section into the home_assistant section within services and a home_assistant_macvlan section to networks. Now let's go set up the networks. And do note that the address is 192.168.1.209 .
Creating the macvlan Docker Network
The config below assumes that your subnet is 192.168.1.0 - 192.168.1.255, your router or switch (gateway) is on 192.168.1.1. It further assumes that your DHCP range on the router does not cross into 192.168.1.208 - 192.168.1.223 and that you want to reserve an address for the interface on 192.168.1.208.
docker network create -d macvlan -o parent=eth0 \
   --subnet 192.168.1.0/24 \
   --gateway 192.168.1.1 \
   --ip-range 192.168.1.208/28 \
   --aux-address 'host=192.168.1.208' \
   home_assistant_macvlan
Can you tell that I dislike the CIDR notation yet? If you're like me do use a CIDR to IPv4 range convertor, it's excellent.
Once done, you can execute, preferably step by step, the following commands. This assumes that your wired network interface on the host is eth0 and that the name of the shim link we're creating is ha_shim .
sudo ip link add ha_shim link eth0 type macvlan mode bridge
sudo ip addr add 192.168.1.208/32 dev ha_shim
sudo ip link set ha_shim up
sudo ip route add 192.168.1.208/28 dev ha_shim
That's not all, as if you want to prevent the issuance of duplicate IP addresses simply to the new ha_shim interface you need to tell your host to deny the DHCP leases on the interface. For raspbian it's echo "denyinterfaces ha_shim" | sudo tee -a /etc/dhcpcd.conf with a sudo service dhcpcd restart to apply the change.
Lastly, make sure that the new ha_shim interface doesn't have any other IP addresses already assigned by running ip addr list and checking which IP addresses are assigned to the ha_shim. If there are any, feel free to remove them via
sudo ip addr del 192.168.1.xxx/xx dev ha_shimAssuming you have done this, replace 192.168.1.100 with `192.168.1.2209 for all of the following steps of the guide.
209 and not 208 as the 208 has been reserved for the adapter and Docker won't allow you to assign your container to the address 208, so we're picking the next one in the range we defined - 209.To set static IP on RPI you need to nano /etc/dhcpcd.conf and modify the following lines:
# Example static IP configuration:
interface eth0
static ip_address=192.168.1.100
#rest can stay commented
I personally went further and disabled the wlan0 interface on my RPI as even this wasn't enough to prevent double-allocation of IP address with the same MAC address. Bizarre.
Now you can run docker-compose up , wait for dependencies to load and see the logs pouring in. Ideally, by the end of it you'll have a working Home Assistant instance, and you can find it at 192.168.1.100:8123 , where 192.168.1.100 is the IP address of your RPI (or other host). To restart without being "locked" into the logs run docker-compose down, wait for it to report success and then docker-compose up -d which will run the container and will detach the terminal for you to use.
HACS
Home Assistant's great, except for some gatekeeping, so HACS exists - it's a Home Assistant Community Store that allows access to Integrations outside of Home Assistant's lengthy review process. To install it, you need to enter your newly created container's terminal (inception, I know):
docker exec -it home_assistant bashNow once inside, follow the installation manual by running:
wget -O - https://get.hacs.xyz | bash -And finally restart the container via reboot . You will be thrown out of the environment and now you can navigate to Home Assistant again in your browser and complete the configuration.
Proceed with the Initial Configuration of HACS, register the device using GitHub API and you should be able to navigate to http://192.168.1.100:8123/hacs/dashboard and search for our next step - IPMI Connector by @ateodorescu:
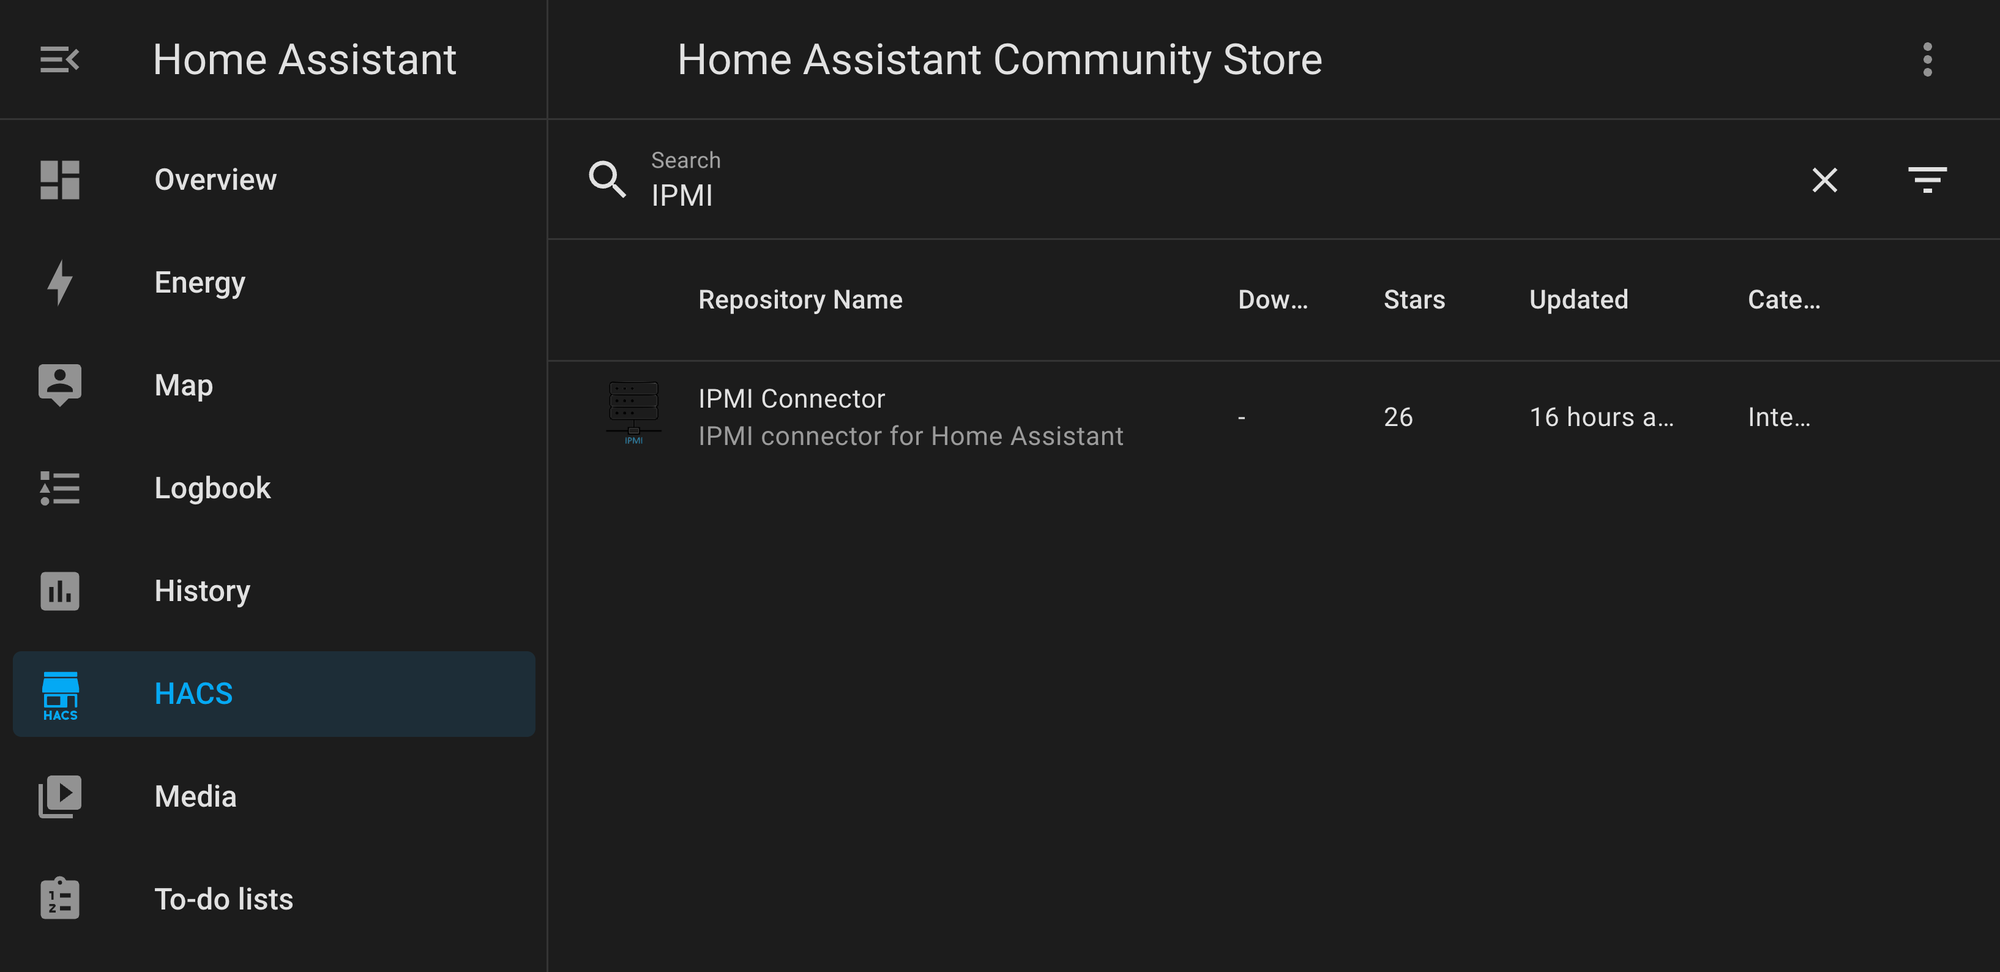

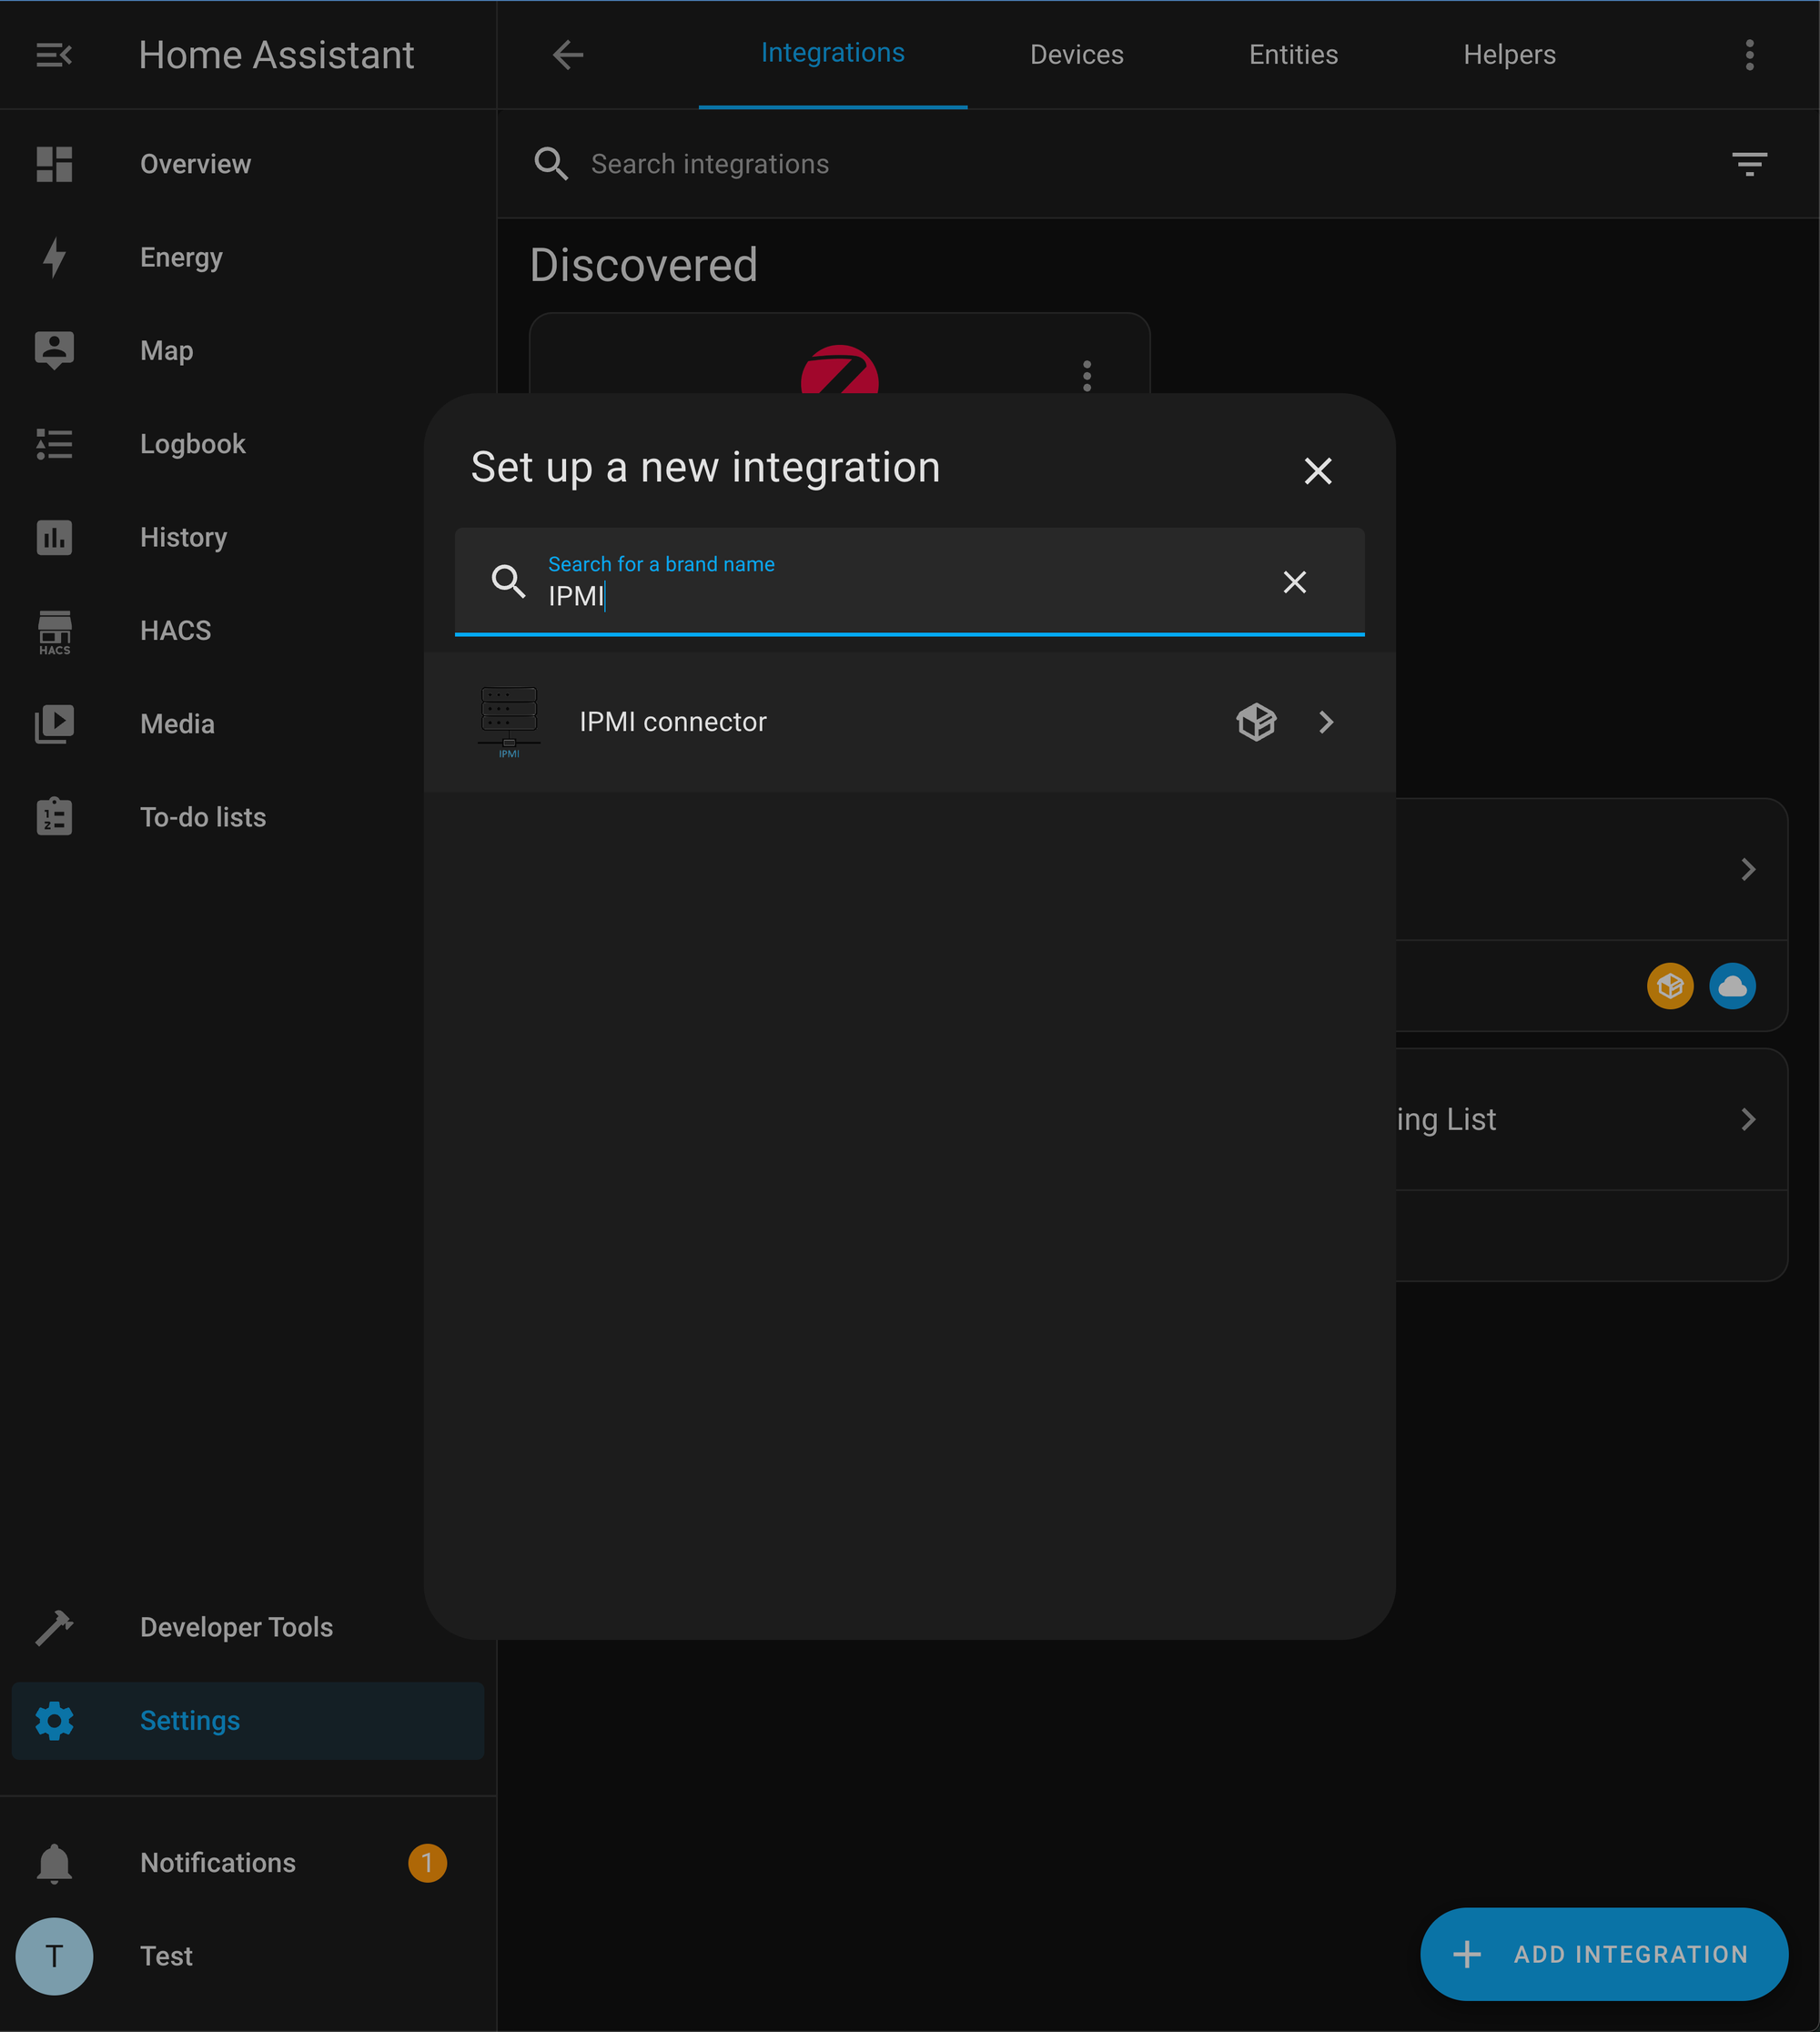
A gallery showing steps of installing IPMI Connector in HACS and finding it in Home Assistant Integrations.
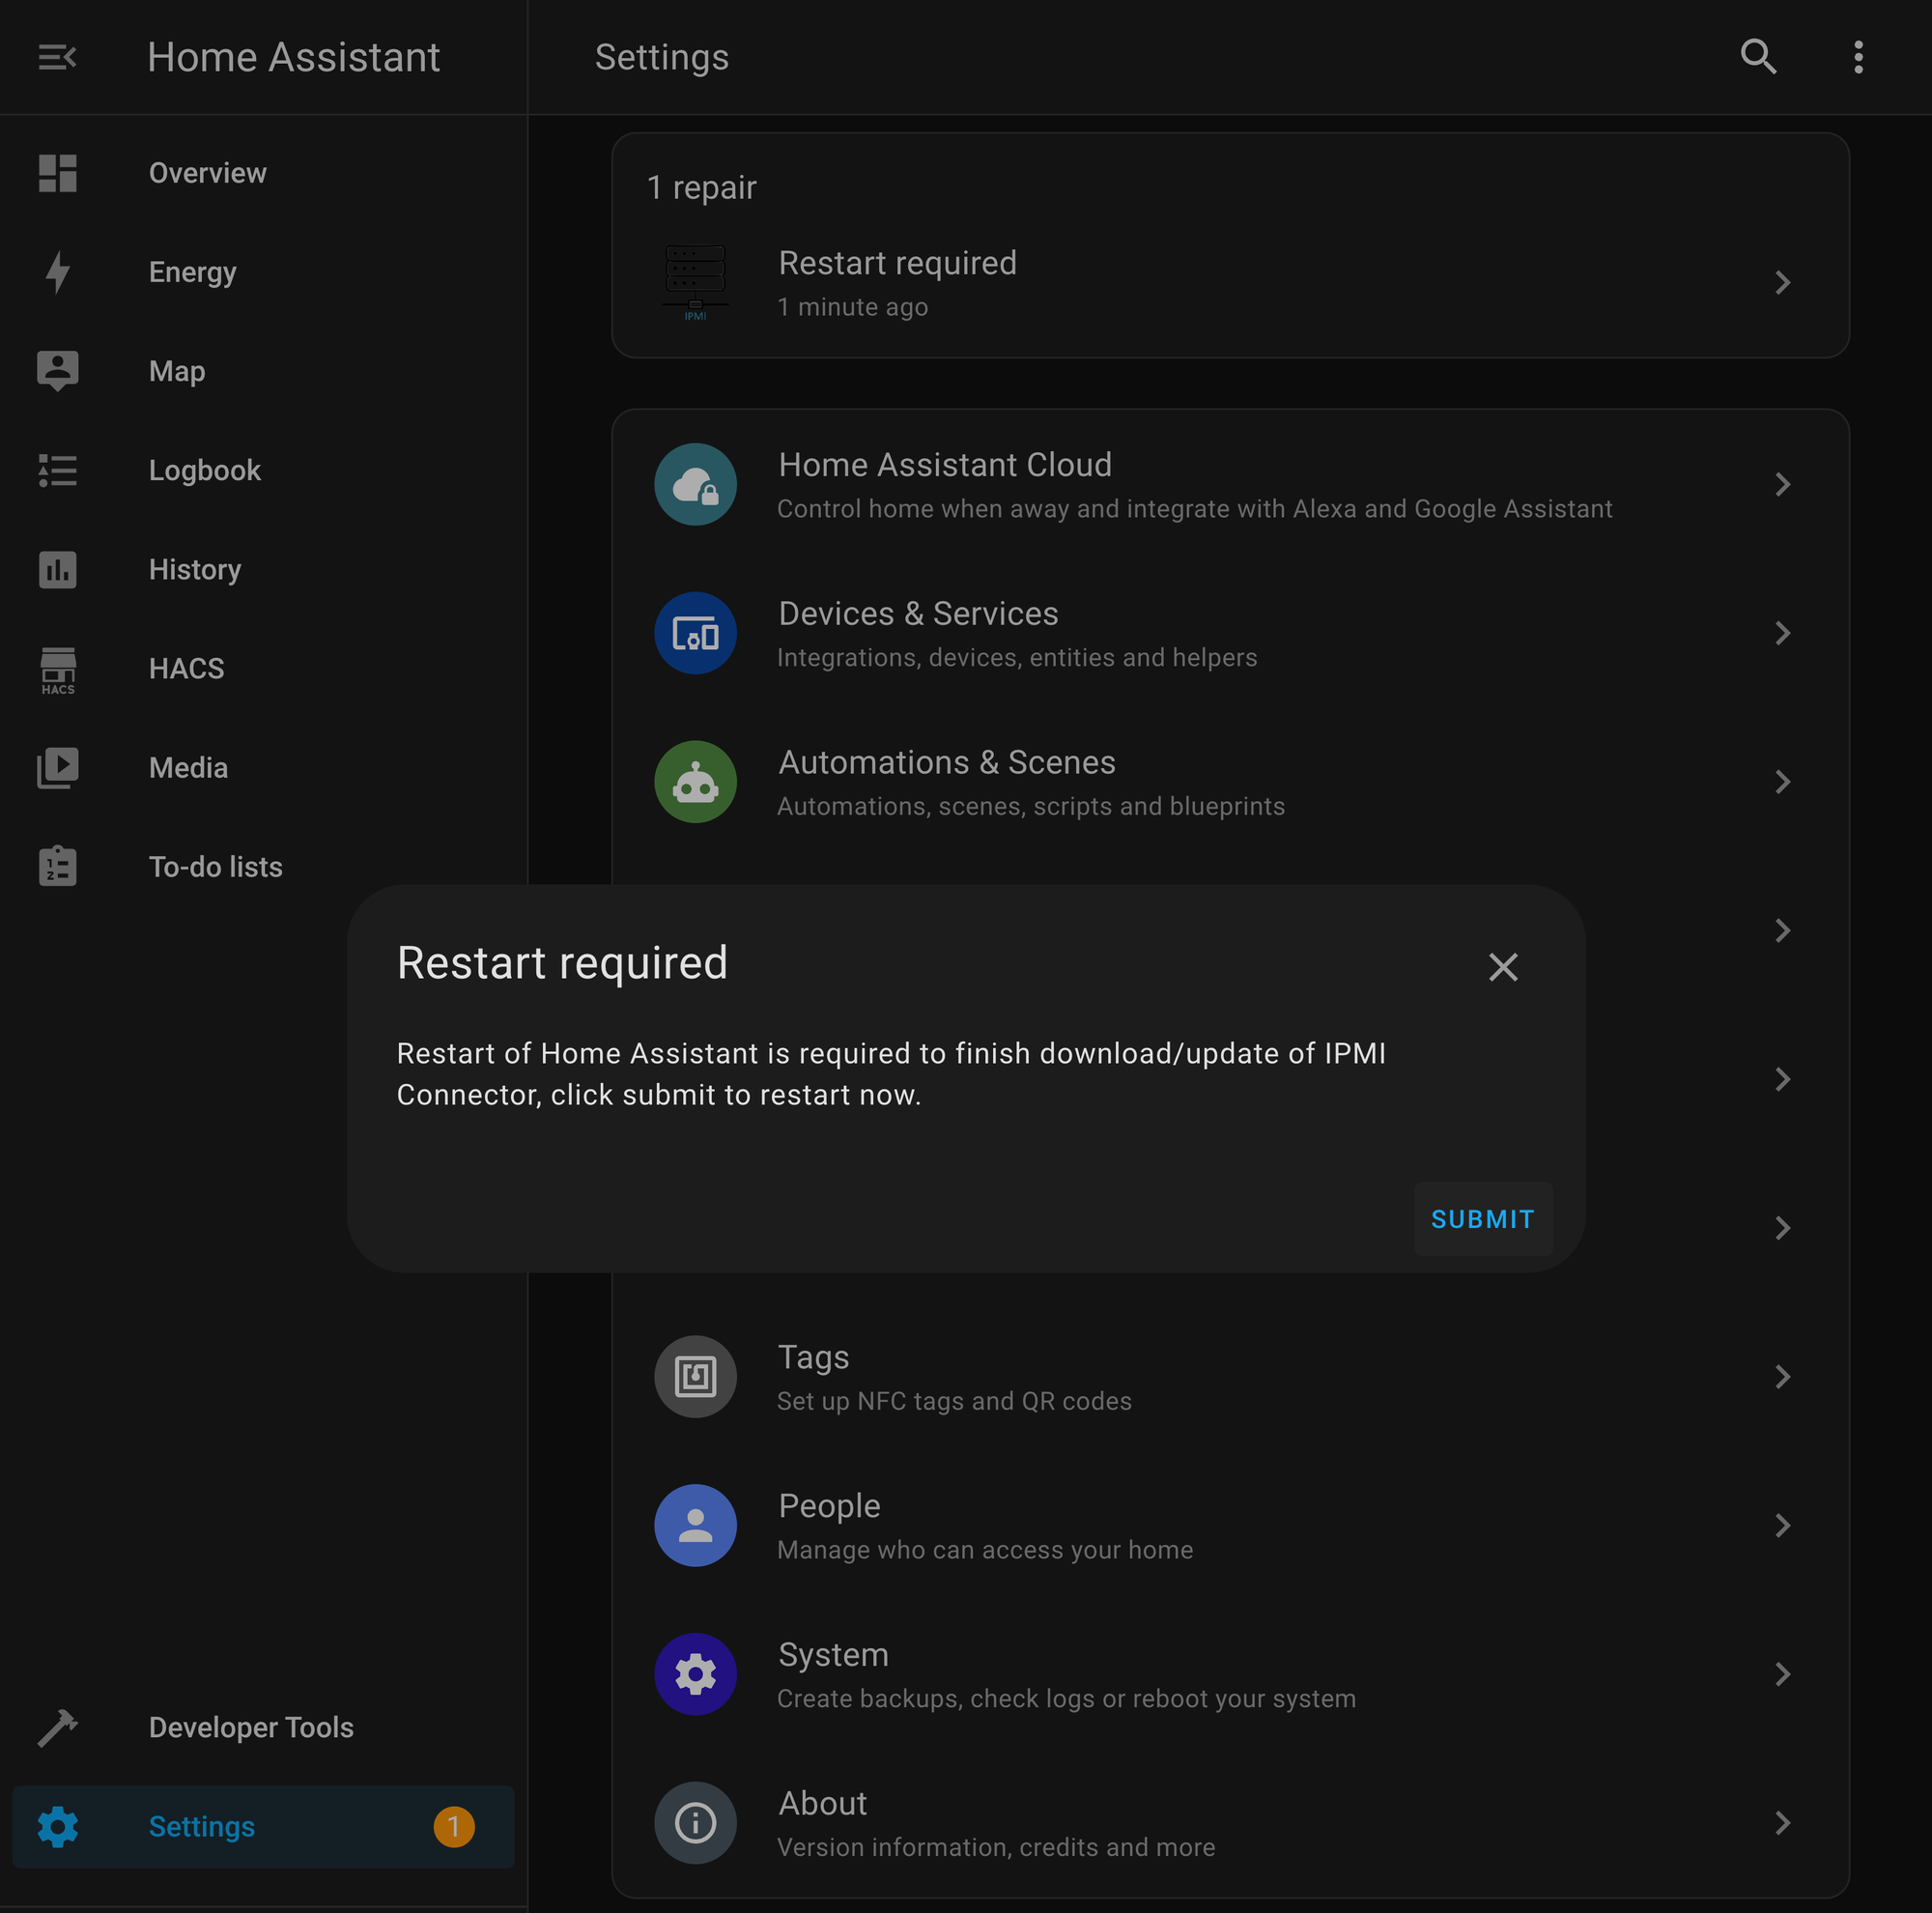
Proceed with the download, restart Home Assistant and confirm that IPMI Connector is present in native Home Assistant Integrations. No further action required now, let's switch gears and set up another Docker container.
IPMI-Server Container
As you might have read when installing IPMI Connector from HACS, it's simply a wrapper over JSON that's supposed to be received from ipmi-server, also written by @ateodorescu. However, it's only available as an Add-on out of the box, and due to containerised nature of our Home Assistant installation we have to fare for ourselves.
That's why I took the liberty to repackage the ipmi-server Add-on and create a standalone Docker container as well as push it to Docker Hub so anyone can use it as-is, without building it themselves. It's time to set up another Docker Container!
Docker Compose
/home/
└── username/
    └── docker/
        └── ipmi_server/
            ├── 🗁 home_assistant_config/ (will be created automatically)
            └── 🗋 docker-compose.yml
And within it, the docker-compose.yml:
services:

  ipmi_server:
    image: mneveroff/ipmi-server:latest
    container_name: ipmi_server
    hostname: ipmi_server
    restart: unless-stopped

networks:
  default:
    name: shared_net
    external: true
You can see that we're reusing shared_net here, which will allow us to both connect with our IPMI server, that's presumably on the same network as our RPI host and connect with Home Assistant container without any proxying or forwarding.
Run docker-compose up -d and make sure that the container stayed up, check the logs if there are any issues, I recommend ctop for all your Docker needs.
Testing the connectivity
It's important at this point to test two things:
- Connectivity to IPMI interface from the ipmi-server container
- Connectivity to ipmi-server container from Home Assistant
To do that, first let's run docker exec -it ipmi_server bash and once inside do
ipmitool -I lanplus -H 192.168.1.101 -U ha-ipmi-user bmc infoWhere 192.168.1.101 is the IP address of your IPMI interface and ha-ipmi-user is the username of a user with ADMIN permissions. I recommend creating a standalone user for this purpose. Once executed you should be prompted for the password and then receive information about your machine:
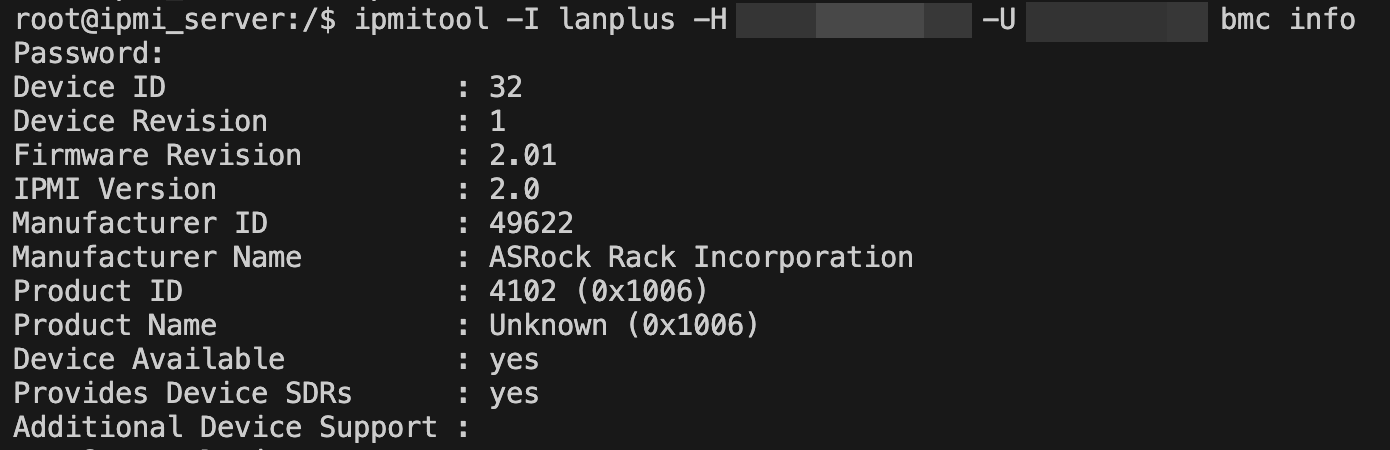
ipmitool command executed inside ipmi-server container.Assuming that's in order, let's type exit and then docker exec -it home_assistant bash . Once inside all we need is a simple command:
curl ipmi_serverAssuming you've configured everything up to this point correctly you should see the following text, reading {"success":false,"message":"Wrong connection data provided!","debug":"No hostname provided!"}

curl call from home_assistant container to ipmi_server on port 80.Assuming you've got both - congratulations, we're almost to the finish line.
Finish configuring Home Assistant IPMI Connector
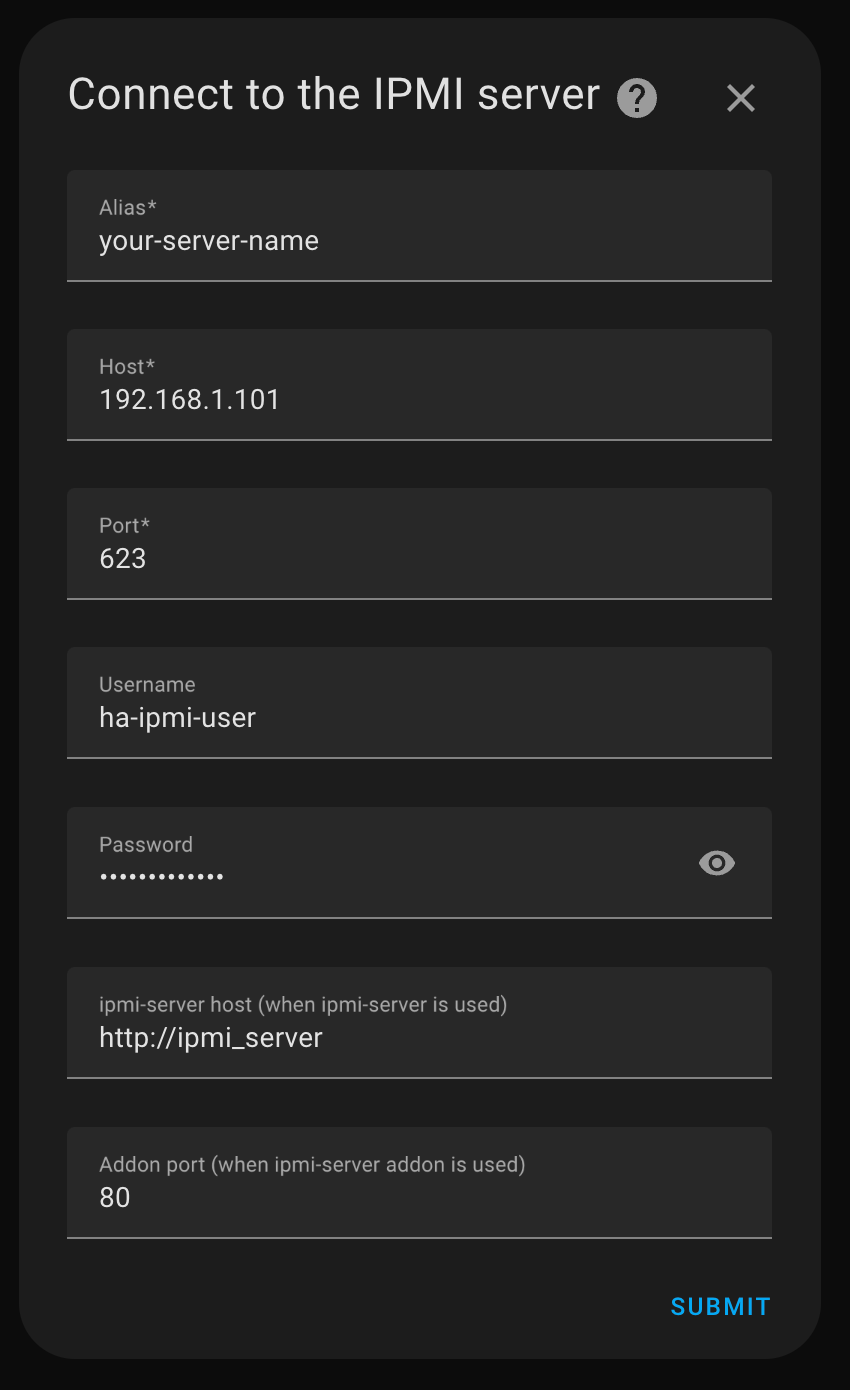
Navigate back to http://192.168.1.100:8123/config/integrations/dashboard and search for IPMI Connector again. Now we can finish the setup. Wait until it'll configure the ipmi wizard and fill out the form as follows:
- Host - your IPMI interface address, in this guide it's
192.168.1.101 - Username - the username for dedicated IPMI user with
ADMINrole - Password - the password for the aforementioned user
- ipmi-server host -
http://ipmi_server. The presence ofhttp://is vital as it won't work without it. If you're using the Home Assistant Add-on then leave it ashttp://localhostas is default. - Add-on port - use
80when following this guide and using a standaloneipmi-servercontainer or leave9595if using the Add-on
Rest are truly up to you there.
Initialise the connection and wait for 2-3 minutes, depending on how slow your IPMI interface is, for the Integration to configure all of the sensors, actions and toggles. Once done you should be able to see the flurry of info and the coveted on/off toggle switch for the chassis power.

Configuring HomeKit
Now, truly the last part. Making this whole thing appear in your Control Centre.
We will need to install and configure the official Home Assistant's HomeKit Bridge. There are two ways to configure it: via UI and through configuration. I'll show the UI route but will drop the configuration below a spoiler as well.
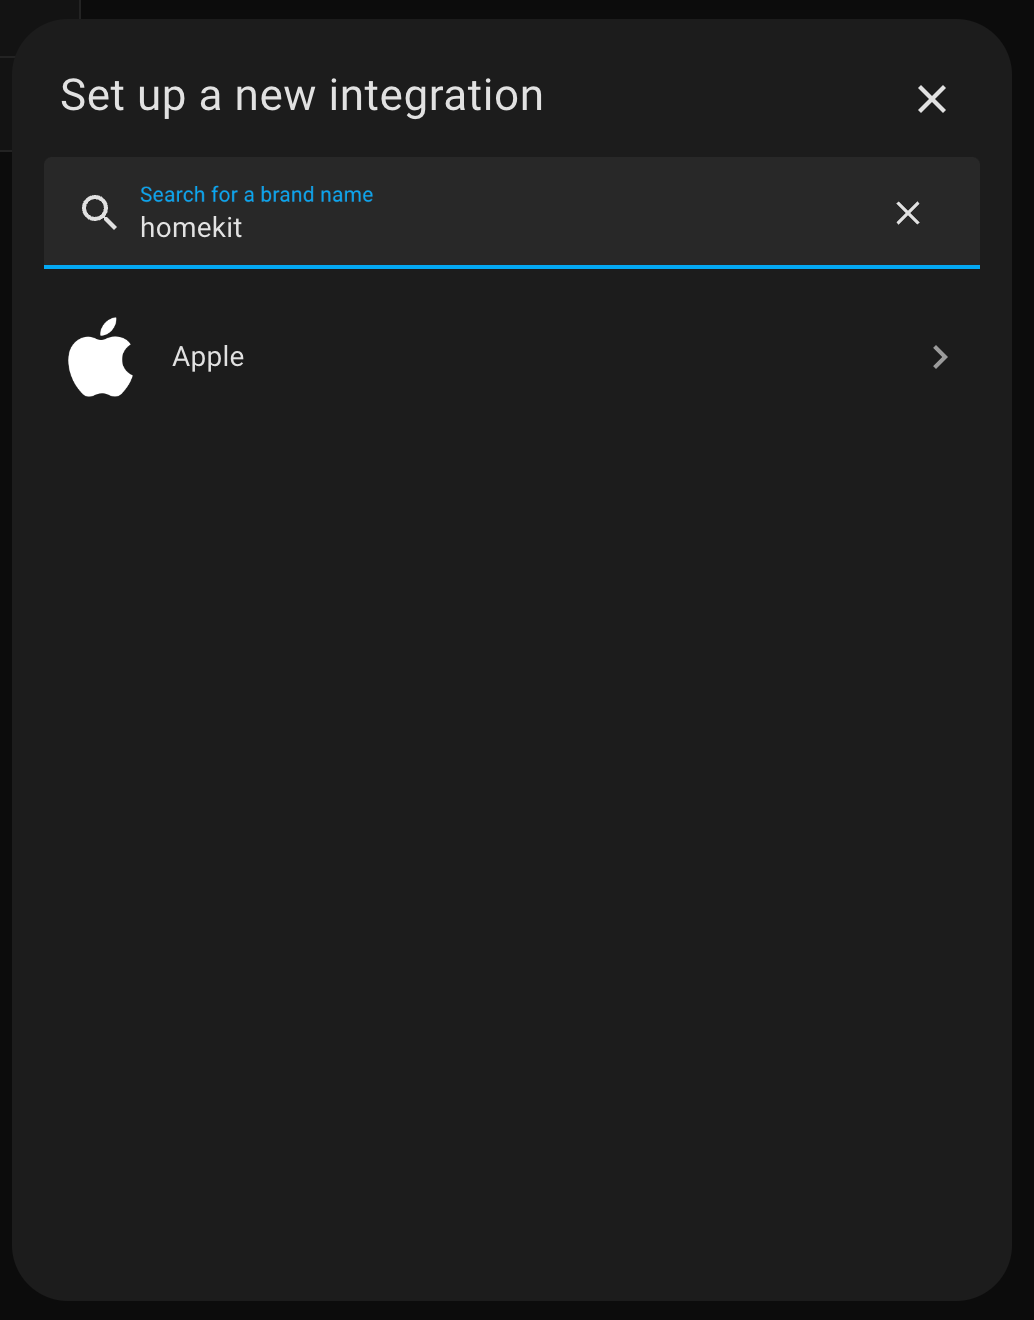
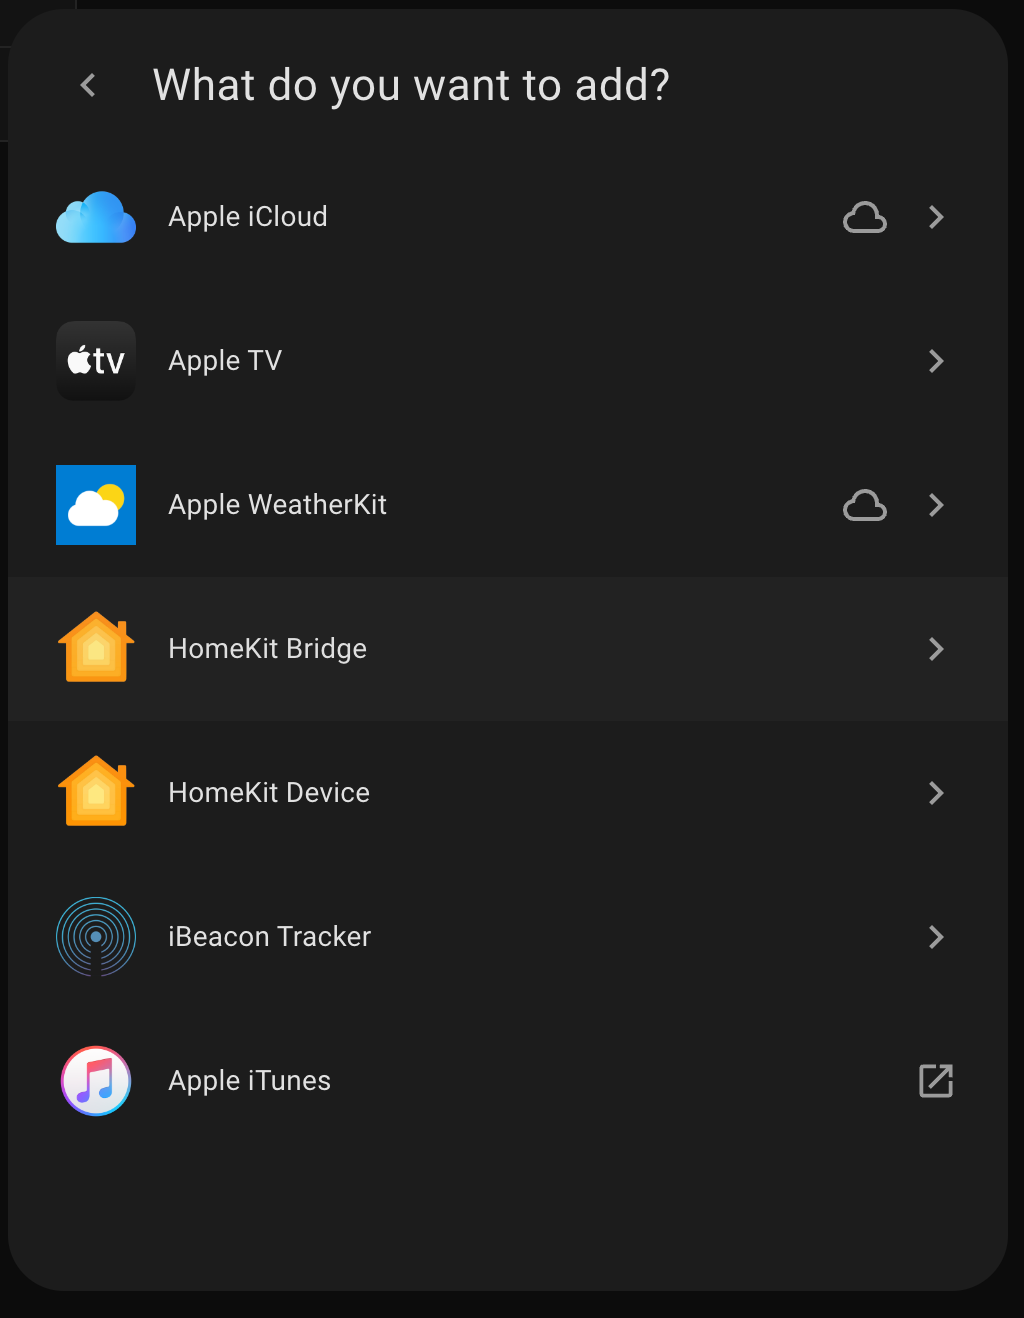
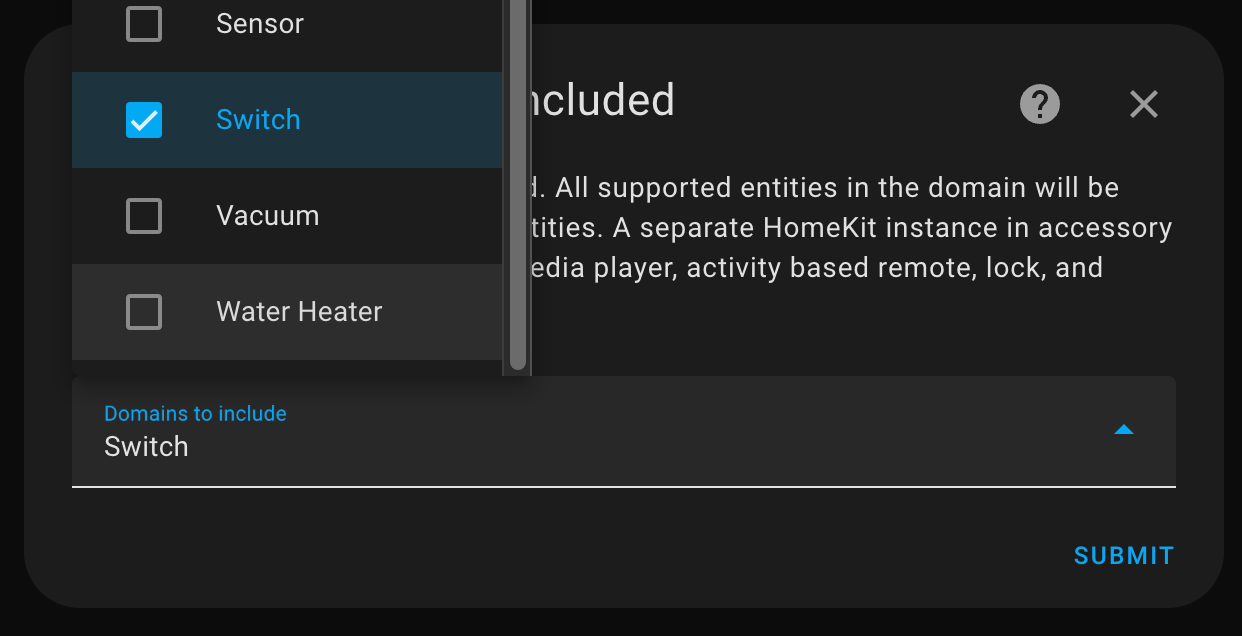
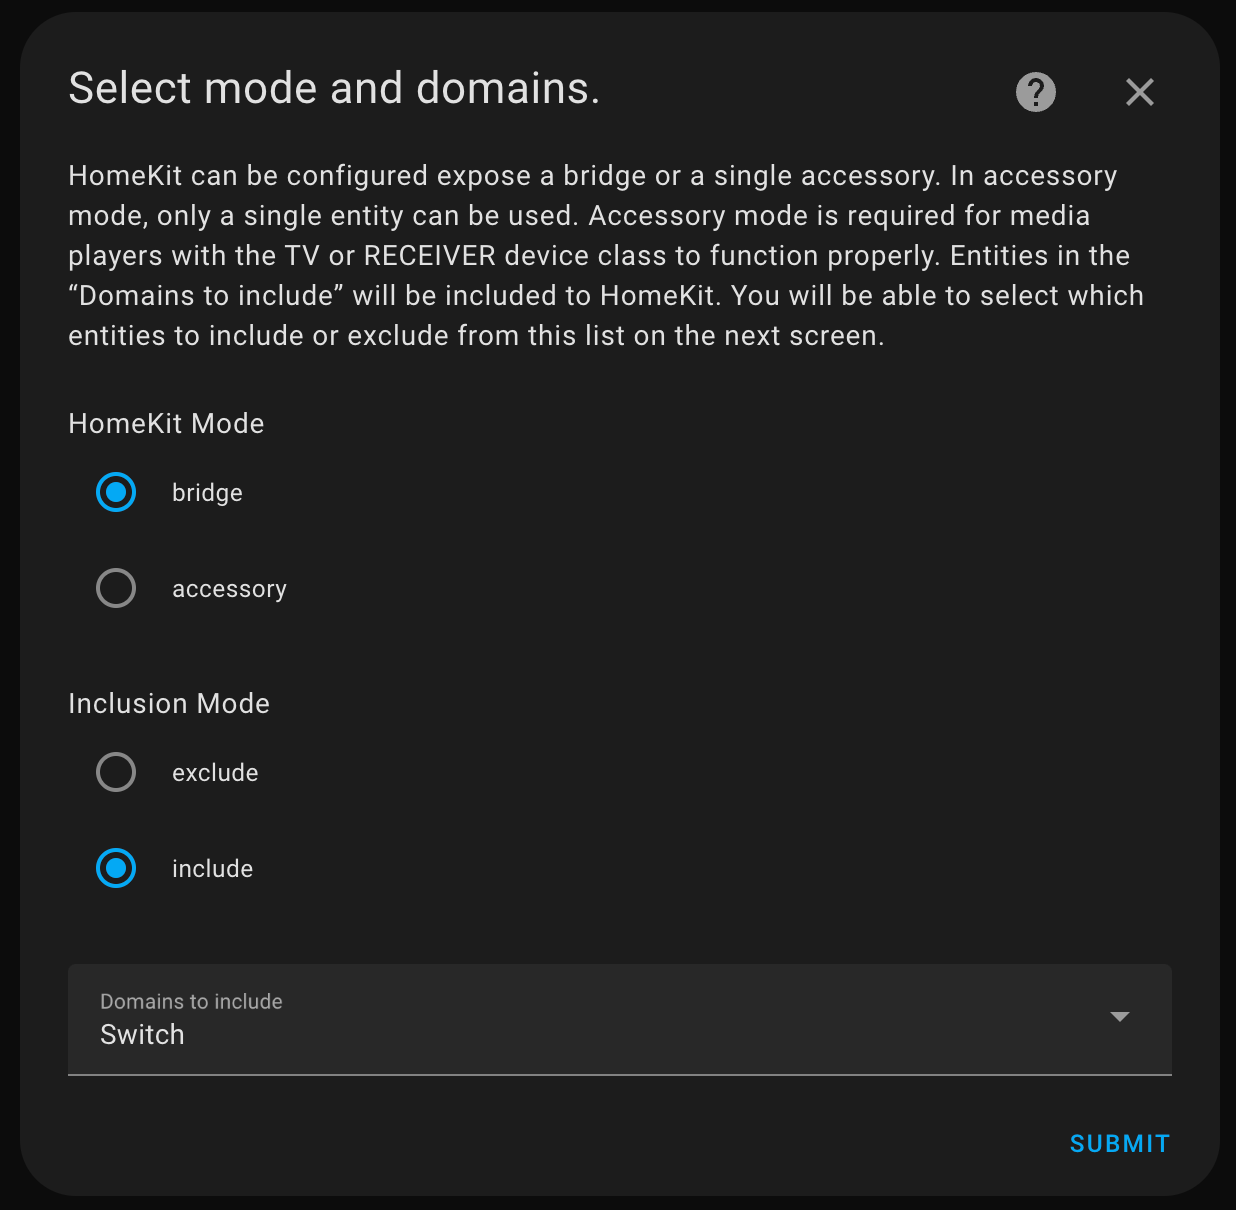
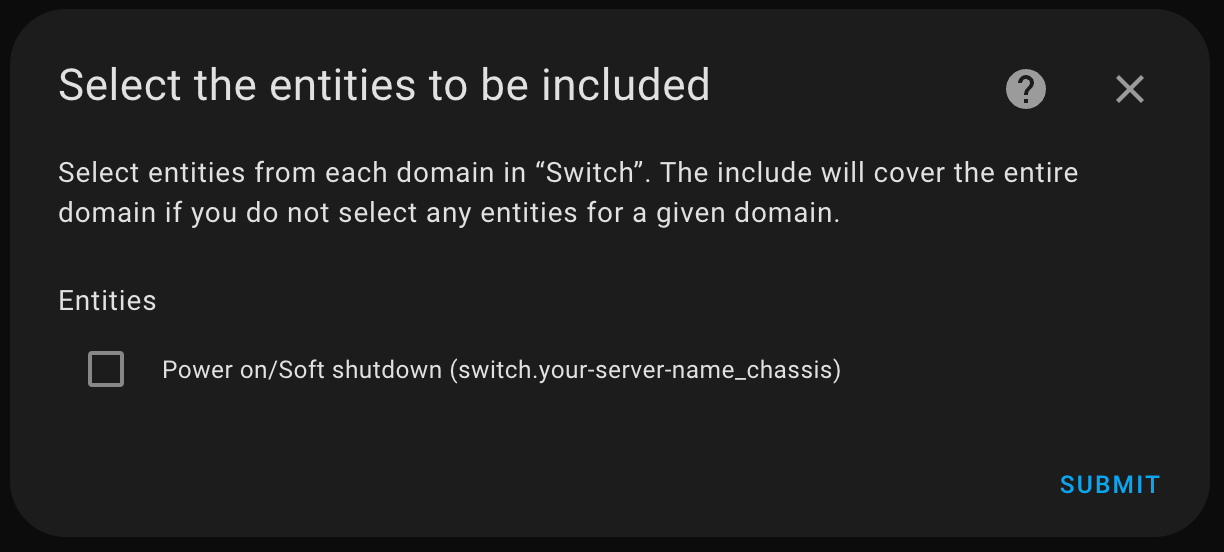
A gallery with screenshots of HomeKit Bridge Integration configuration.
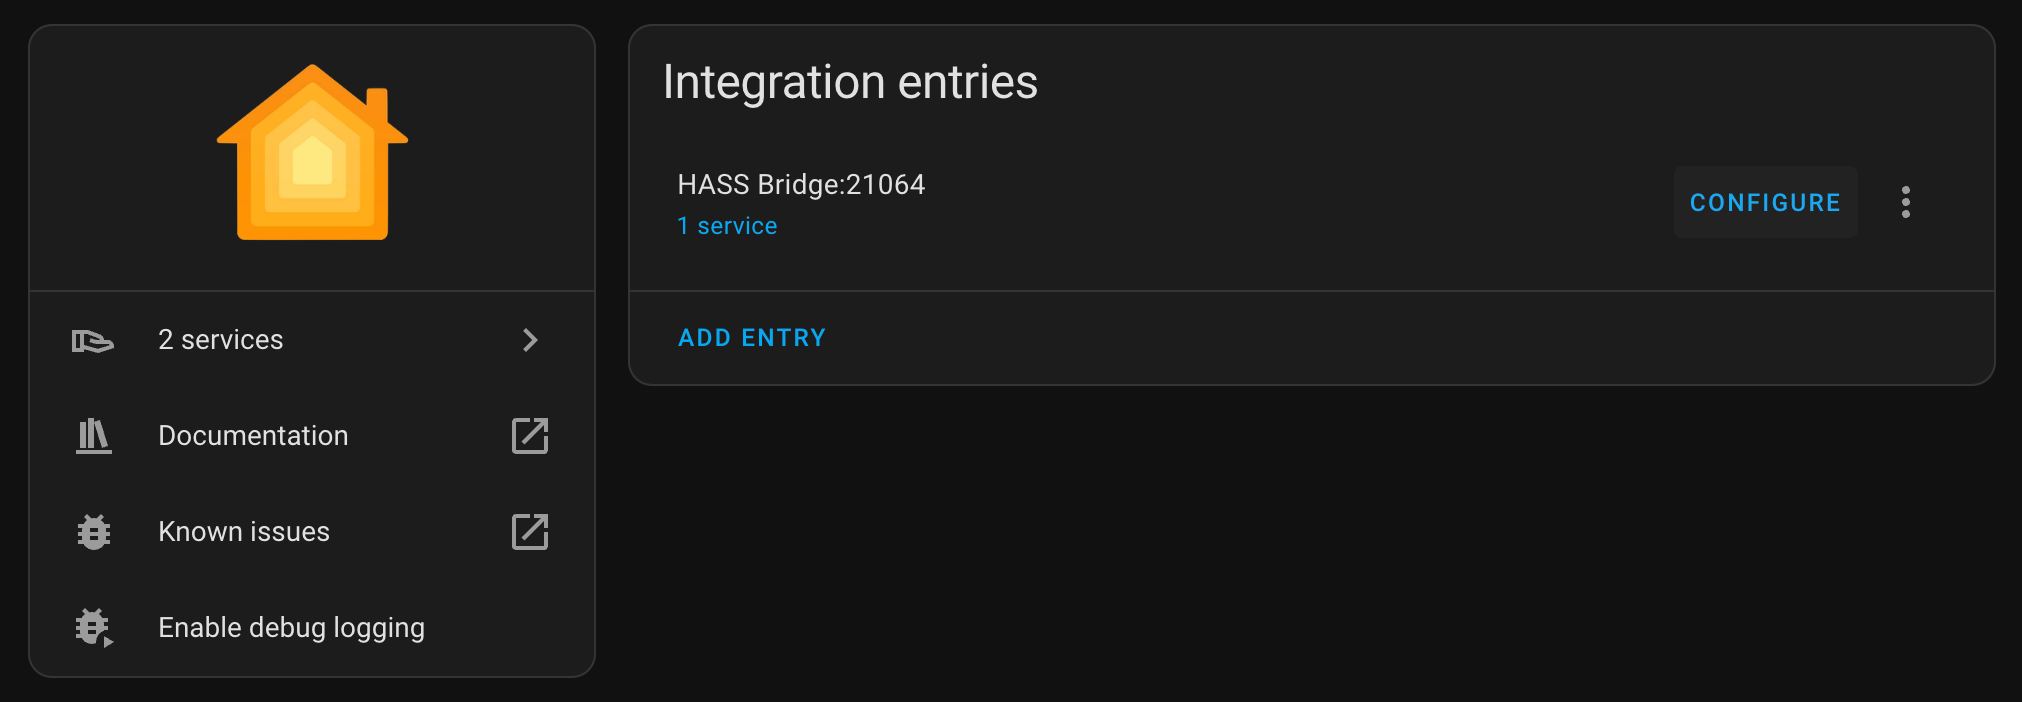
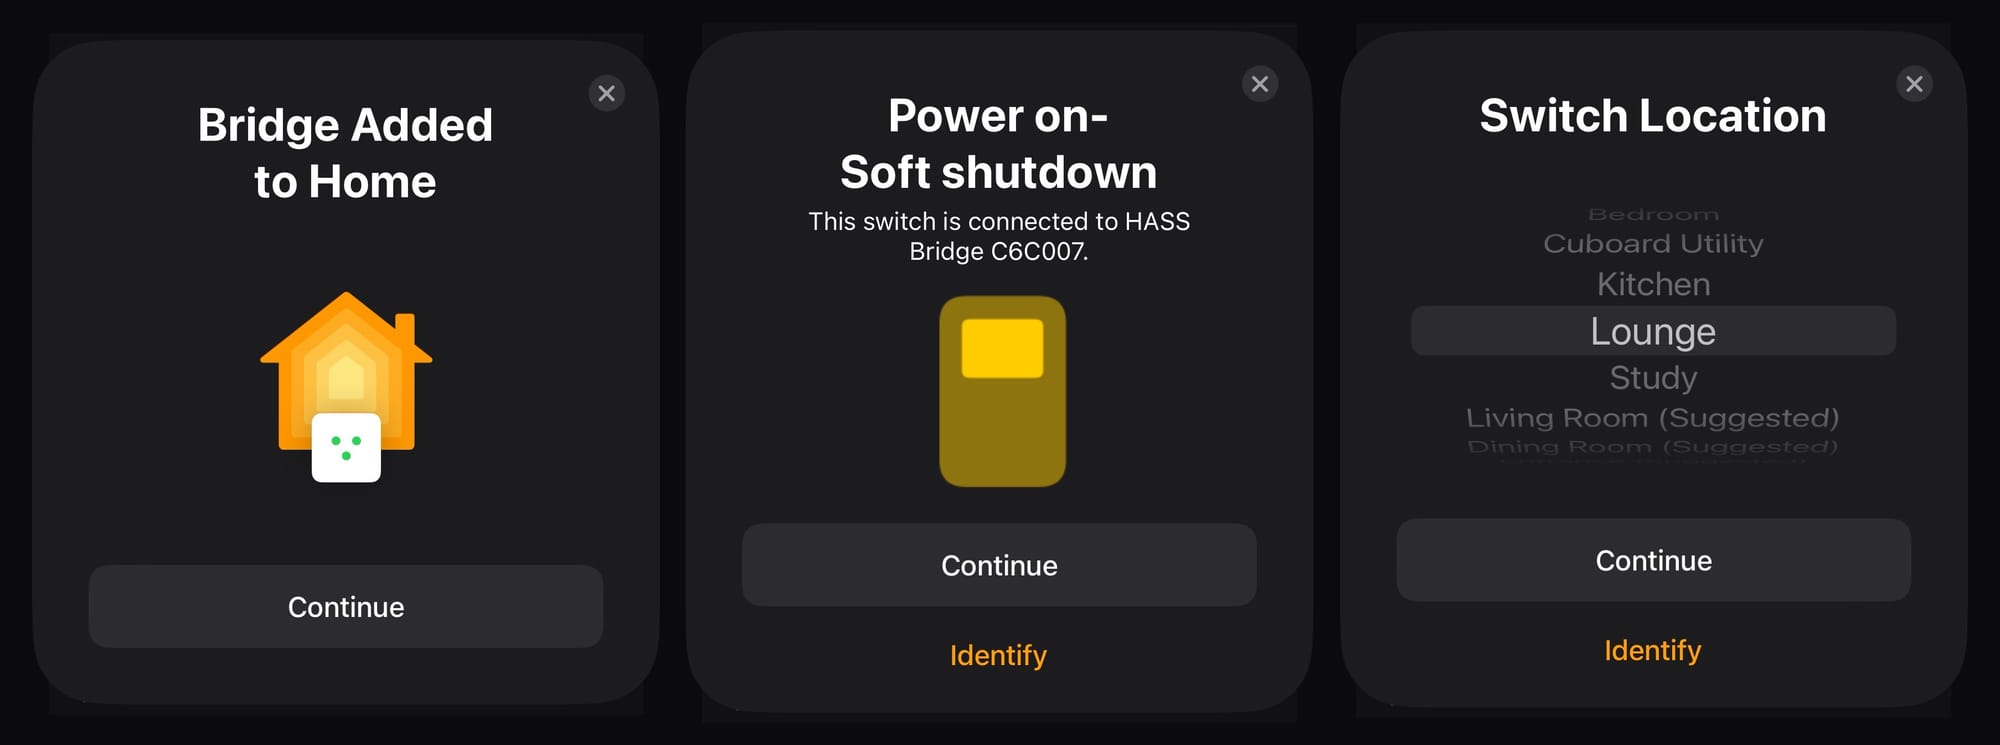
For the Domains we only care about Switches now. Once added, proceed to Submit the form and assign a room to the new Bridge. Don't click away yet, go through to "Configure" and change the mode to Bridge and Include , then select the Power on/Soft shutdown (switch.your-server-name_chassis) . You can ignore the "Advanced Configuration" menu for now.
Manual configuration
I honestly feel like this is easier. All that you have to do is to go to docker/home_assistant/home_assistant_config/configuration.yaml and drop these few lines there:
homekit:
filter:
include_entities:
- switch.j2k_srv_01_chassis
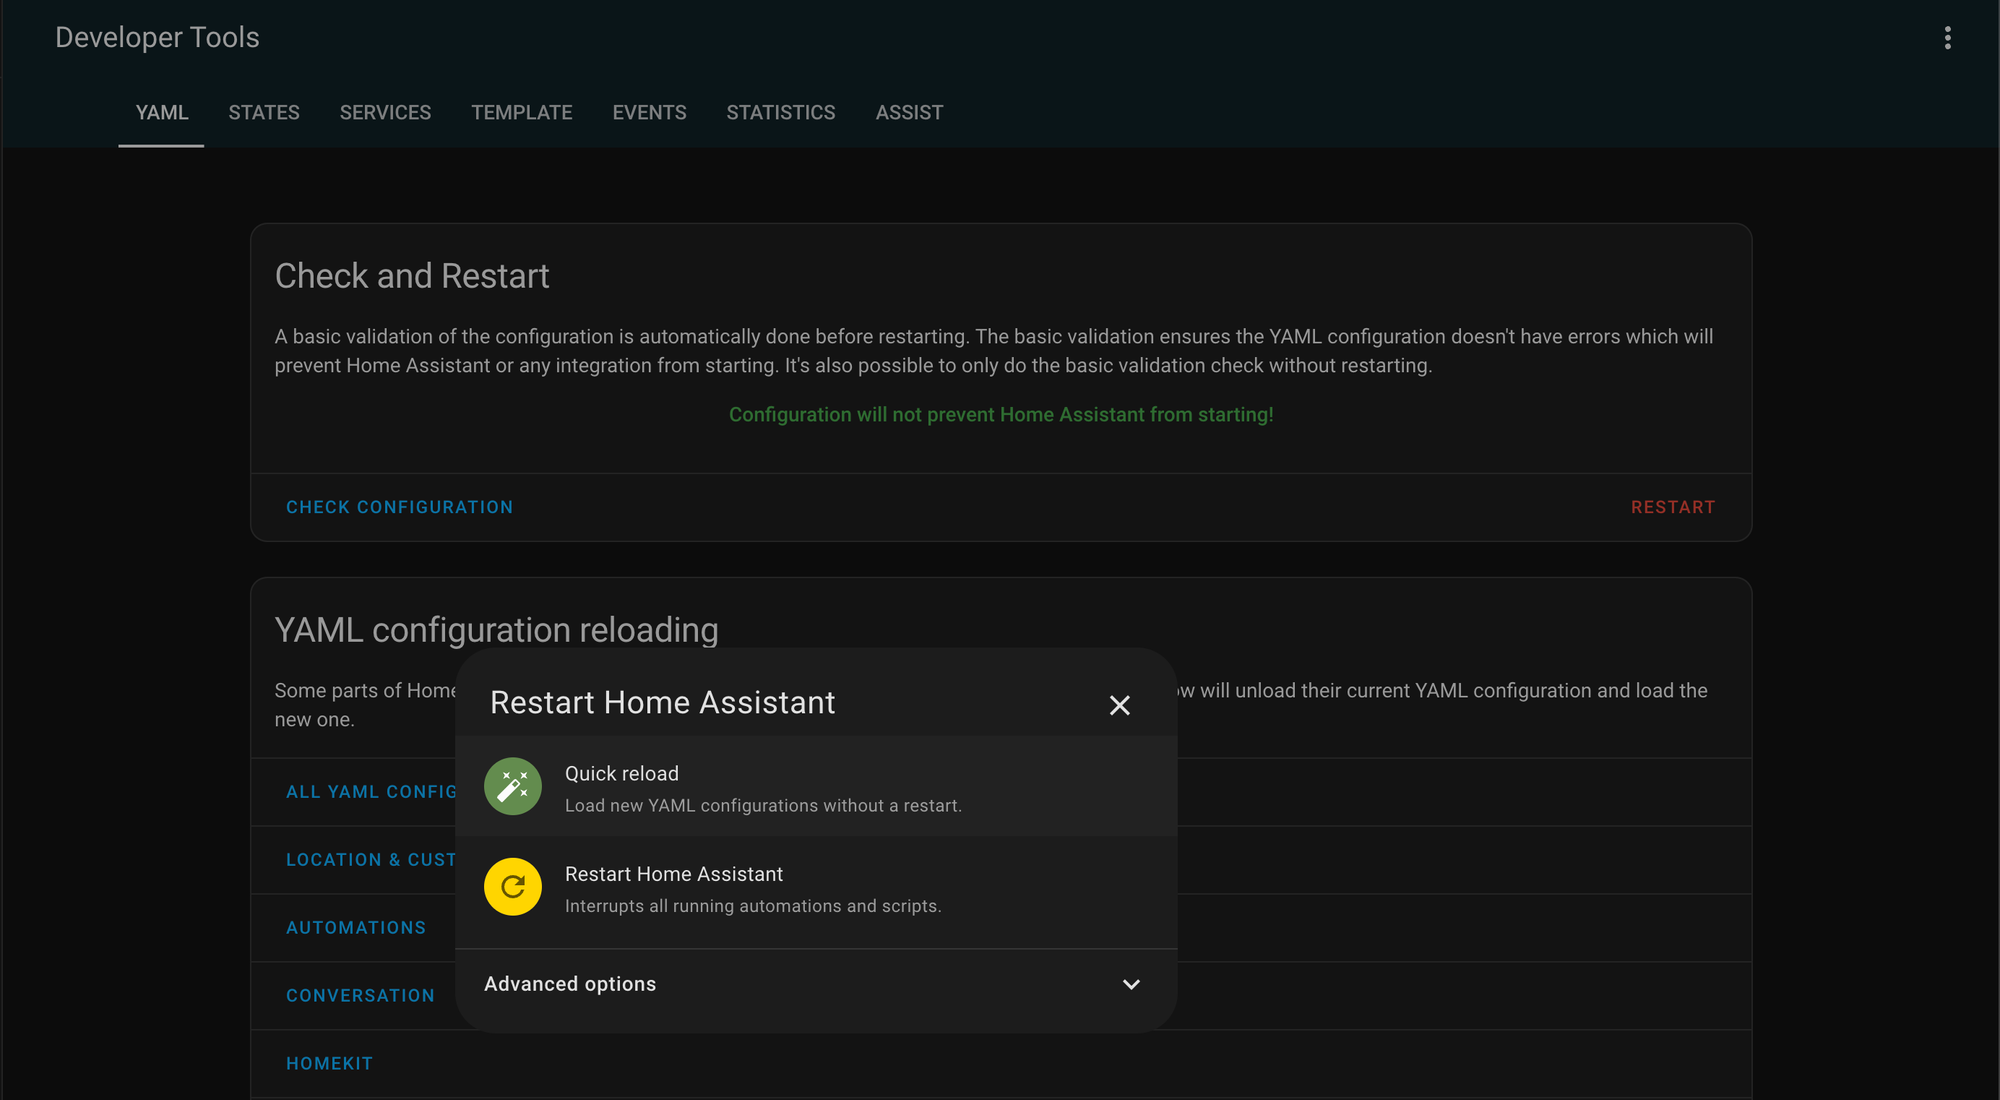
- script.force_off_serverAnd then go to Developer Tools (https://192.168.1.100/developer-tools/yaml) and do a "Quick Reload" so YAML config is applied.
Once done you should be good to proceed to the steps below!
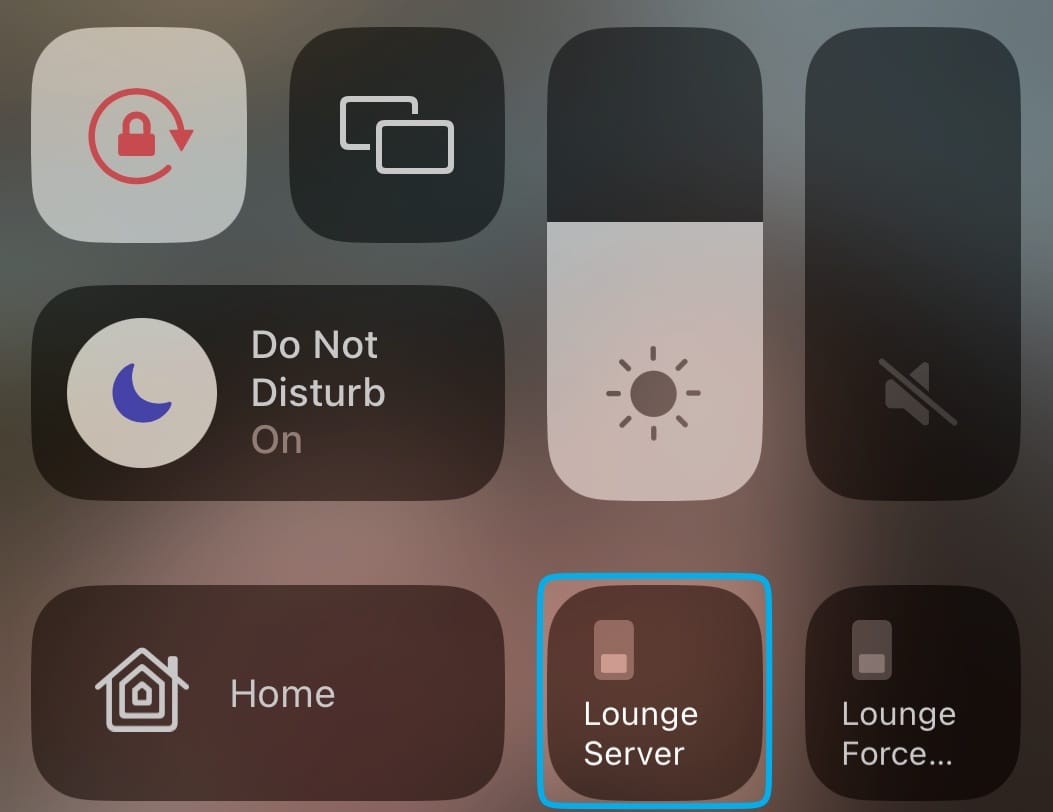
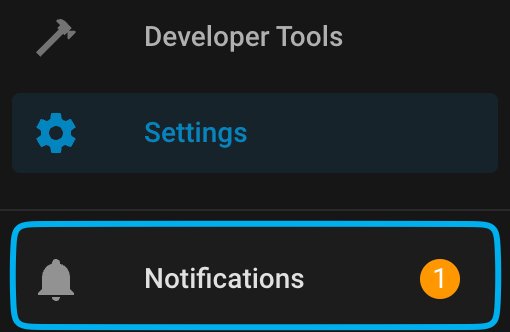
Regardless whether you configured it manually or through the UI, you should now be able to navigate to Notifications which will pull up the QR code for you to scan with your device.

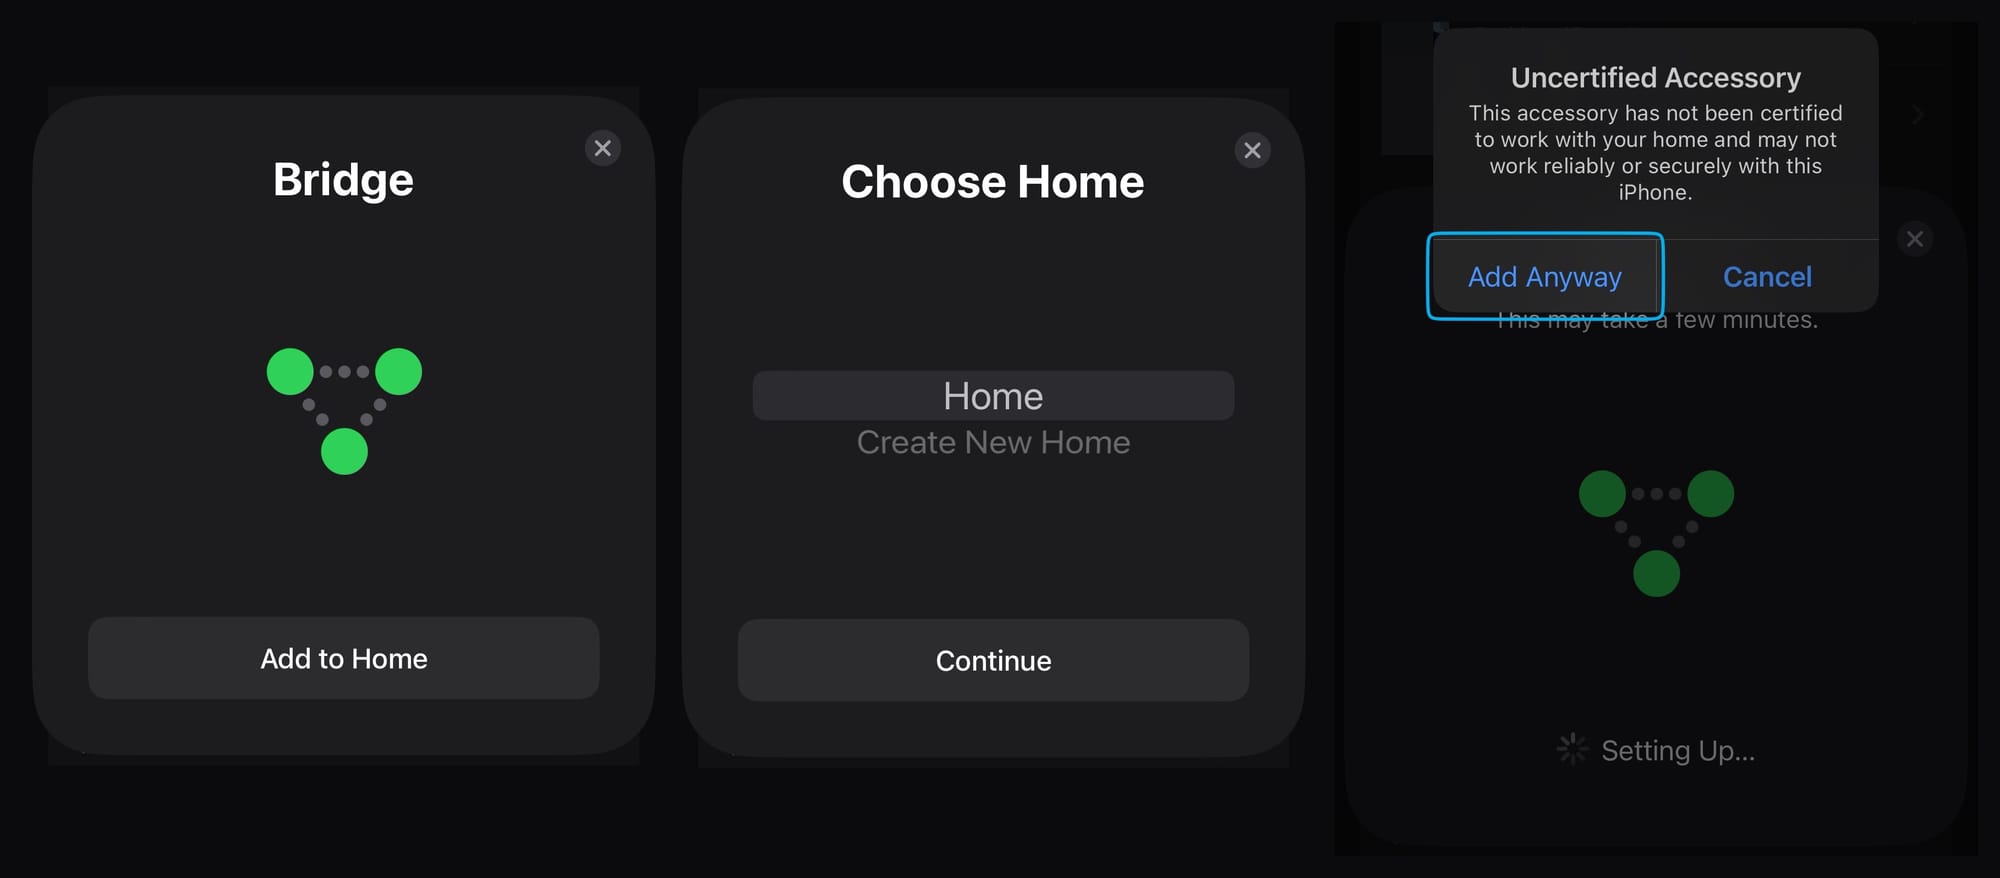
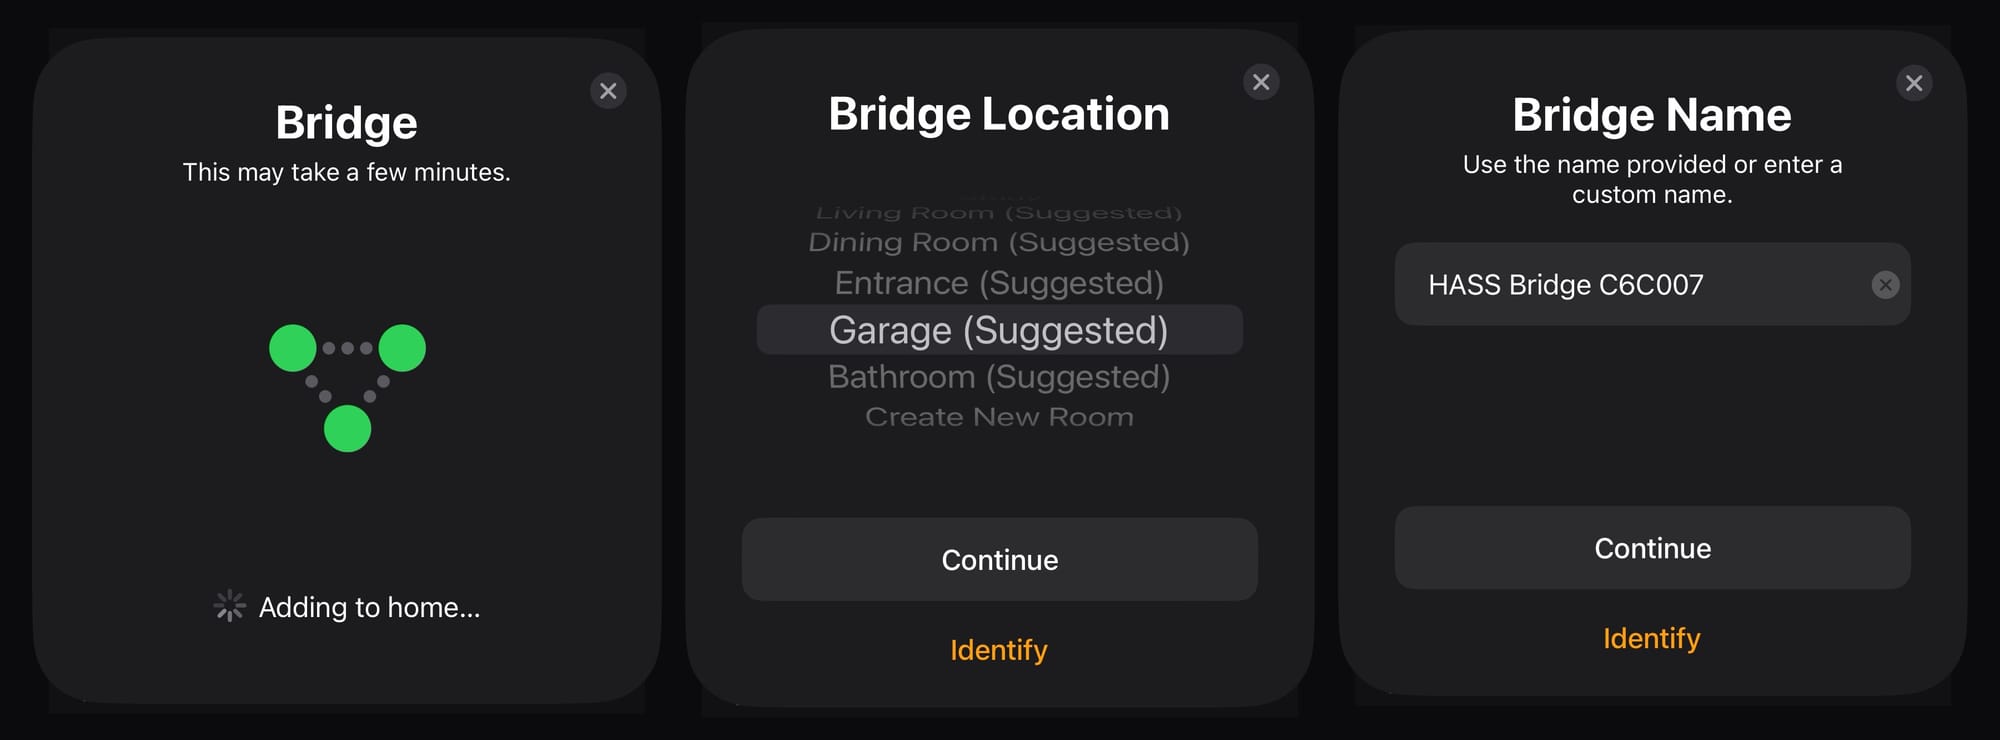
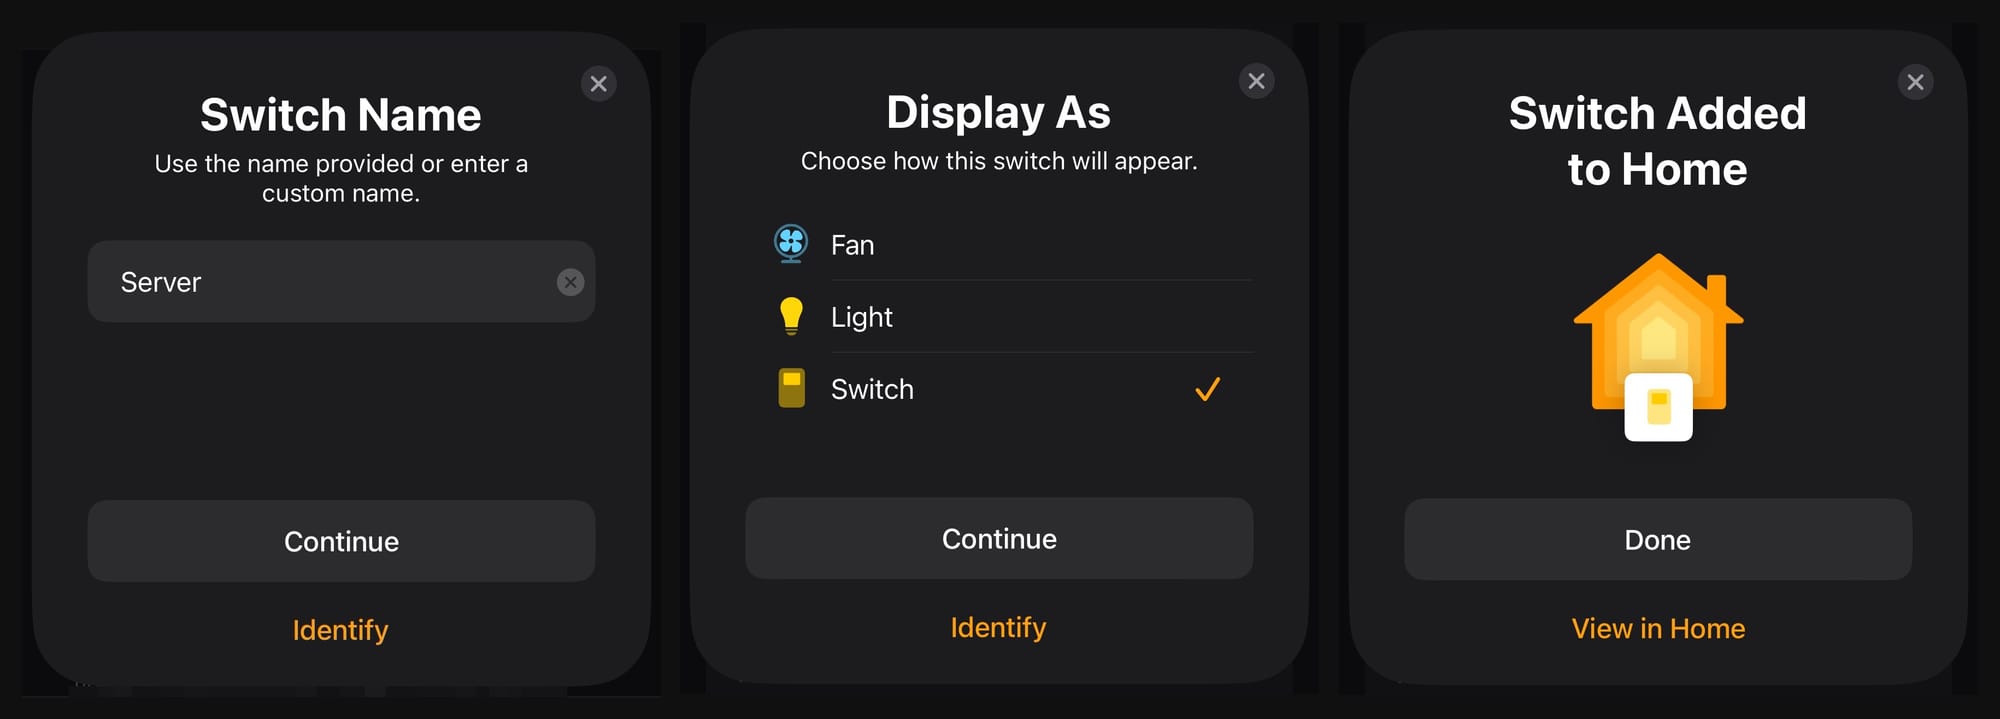
Now all that's left is to pick up your iPhone/iPad or Mac device and finish the install, see the gallery below and feel free to name customise it to your liking.
And by the end of it, if everything went well, you can do the moment of truth from the start of the guide. Come up to your sever and press that fancy button in your Control Centre and see it come alive. Or shut down (granted, doing so gracefully will take a minute or two so it won't be as jaw-dropping).
Acknowledgements & Credit
- @ateodorescu for both home-assistant-ipmi and ipmi-server add-on
- @CM000n for macvlan explanation rundown
- @home-assistant project and the team of maintainers & contributors
- @hacs project and the team of maintainers & contributors
Member discussion