Stripe Payment Link to a file download with a confirmation email in 30 minutes
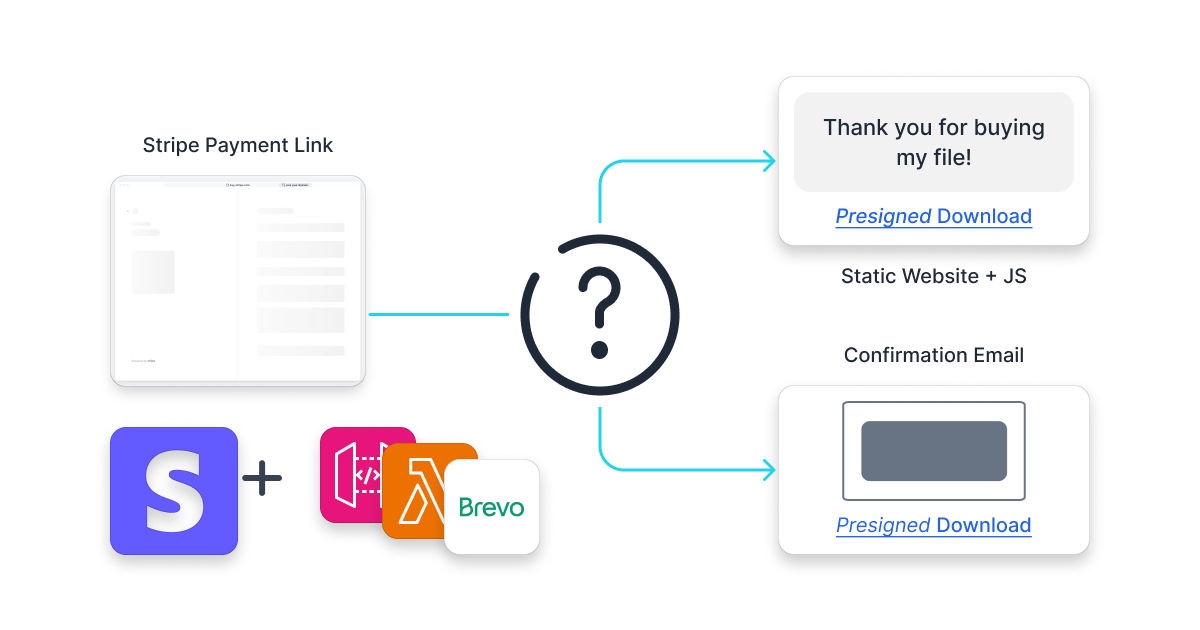
When building the Chapter theme for Ghost and deciding to ship it I asked myself - "how can I let customers download a file from a Stripe Payment Link?", only to find out just how difficult it is to ship a product in a form of a file (or any other downloadable) to a customer once they've paid.
It's supposed to be easy, right? Get Stripe, take payment, download a file. Well, it takes a while to achieve that and in this article I'll show you how to turn it into a seamless experience with Stripe Payment Link.
Overview
Alternatives
Before writing something ourselves, let's recap the alternatives to this surprisingly difficult ask: KoFi, Gumroad, Lemonsqueezy, Themeforest and so on. Naturally, they all have their own little fees:
| Service | Price | Note |
|---|---|---|
| KoFi | 5% + processing (3% + 30¢) | 0% + processing with $9/month membership |
| Gumroad | 5% + processing (3.5% + 30¢) | 0% + processing with $10/month membership |
| Lemonsqueezy | 5% + processing (3% + 30¢) | Didn't find a 0% suscription |
| Themeforest | 55% (fifty five, yes) | 12.5%-37.5% if exclusive (volume-dependant) |
Whilst KoFi and Gumroad are incredible creator platforms and I applaud them, we can still beat with just processing fees and no monthly subscription whilst owning the entire process ourselves.
Not to mention that the existing options lengthen the "optimal" flow significantly with the redirects and so on, but we can deliver a seamless, 2-second processing experience.
What about Zapier?
Any time I'm thinking something like "well I want to do X when another service does Y" I am thinking Zapier and alternatives. I even signed up to get it rolling, only to find that Zapier's new Stripe Integration does NOT support Test Environment. I am baffled by how that made through Product and stayed that way, but that's not my place to complain. The thread below is:

Goal
Our goal is to achieve as "direct" of a flow as possible from the Stripe Payment Link to the file download. Stripe Payment Link is chosen because it's easy to embed anywhere, in any element of your page, is reputable (hosted by Stripe) and is hosted entirely by Stripe, meaning less downtime risk.

In this article we'll use:
- Stripe, specifically Stripe Payment Link
- Brevo (formerly SendInBlue) with a 300 daily email free tier
- Amazon Web Services for the S3 and Lambda
Browser Flow
The biggest issue we have to solve is serving a file in a secure way, without relying on "security through obscurity". Sadly, because we only have a static website, we can't really store or handle any backend logic there, so we'll need a separate place to process and verify the payment - Lambda, and a third place to securely store the file - S3.

Once we're done, we will have created a system that:
- Handles an HTTP redirect from the Stripe Payment Link with the payment
session_id - Invokes a Lambda function, which in turn:
- Verifies with Stripe if the payment did complete using the
session_id
- Verifies with Stripe if the payment did complete using the
- Generates a pre-signed URL from an S3 bucket with a set lifespan
- Initiates an email delivery passing through the customer email and the URL
- Redirects the request to the static page with a
download_urlparameter - Shows a static Confirmation page and initiates a browser download using the
download_urlparameter
Let's get going!
AWS Lambda, Gateway and S3
I'm assuming that you've already set up your AWS account.
To process the redirects and do the heavy lifting we'll use Lambdas - tiny pieces of self-contained code which will be spun up without a server any time a particular URL is called.
I won't go too deep into the code in this article since there is a plethora of information out there. You can find the main source code and the repo below:
The code for reference
A link to the repository with Lambda source code that you can clone and build yourself.
S3 Bucket
To store our file we'll create a new bucket with standard settings:
- Region of your liking,
Europe (London) eu-west-2for me - Bucket name of your choice,
file-deliveryfor me - Leave Object Ownership on ACLs Disabled and leave "Block all public access" ticked on
- Enable Bucket Versioning
- Leave the Default encryption settings (SSE-S3, Enabled Bucket Key), leave Object Lock disabled
S3 Bucket Creation Images


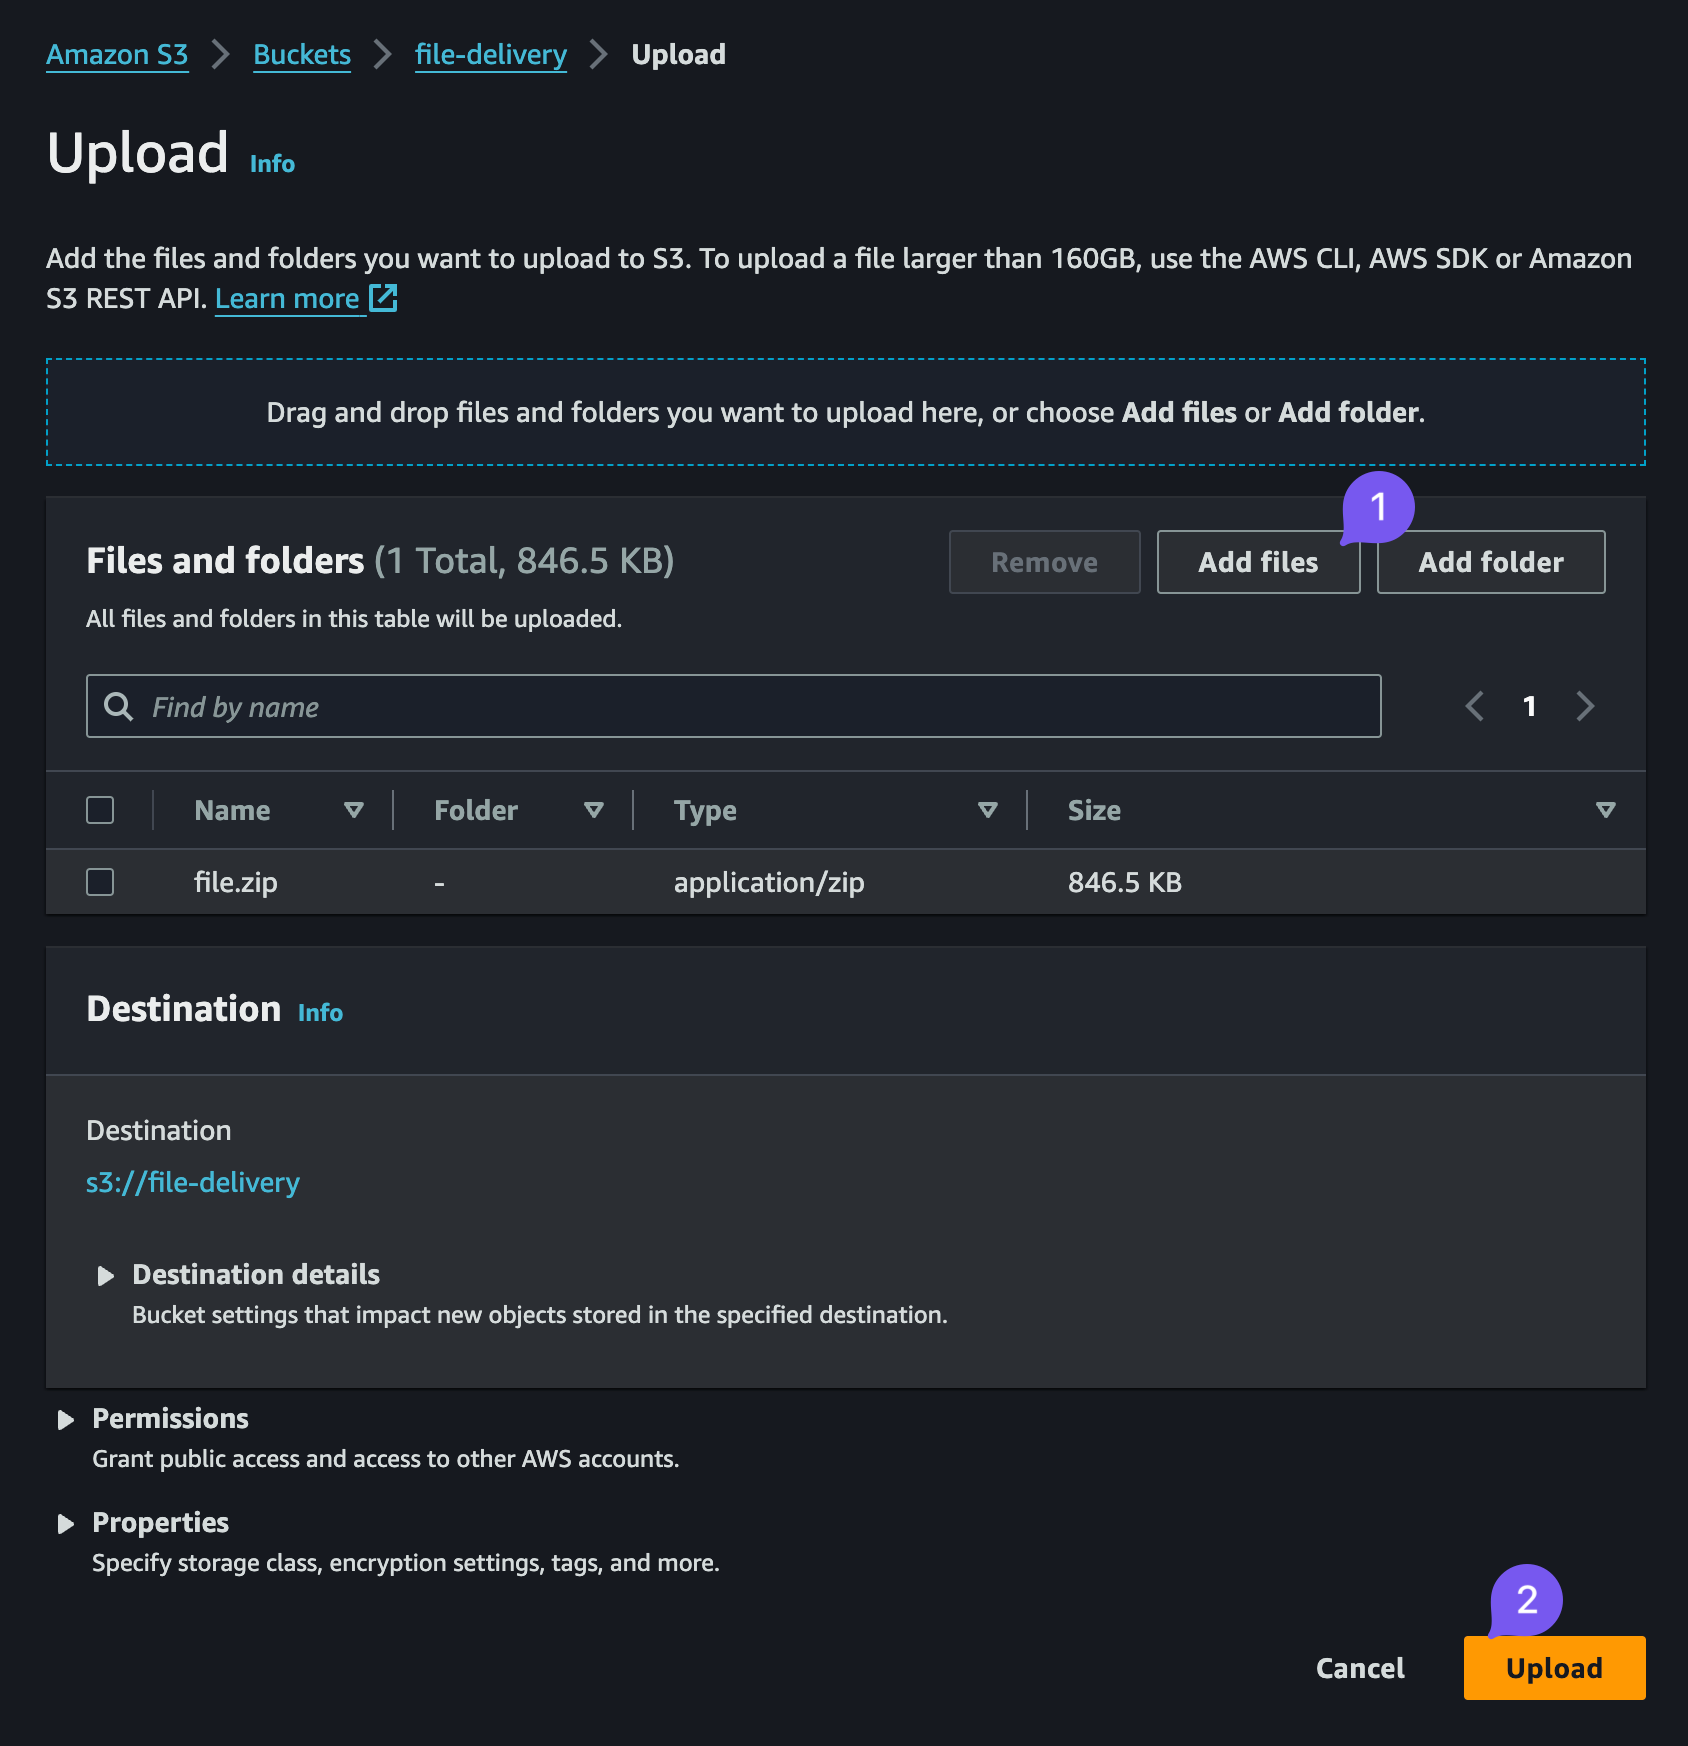
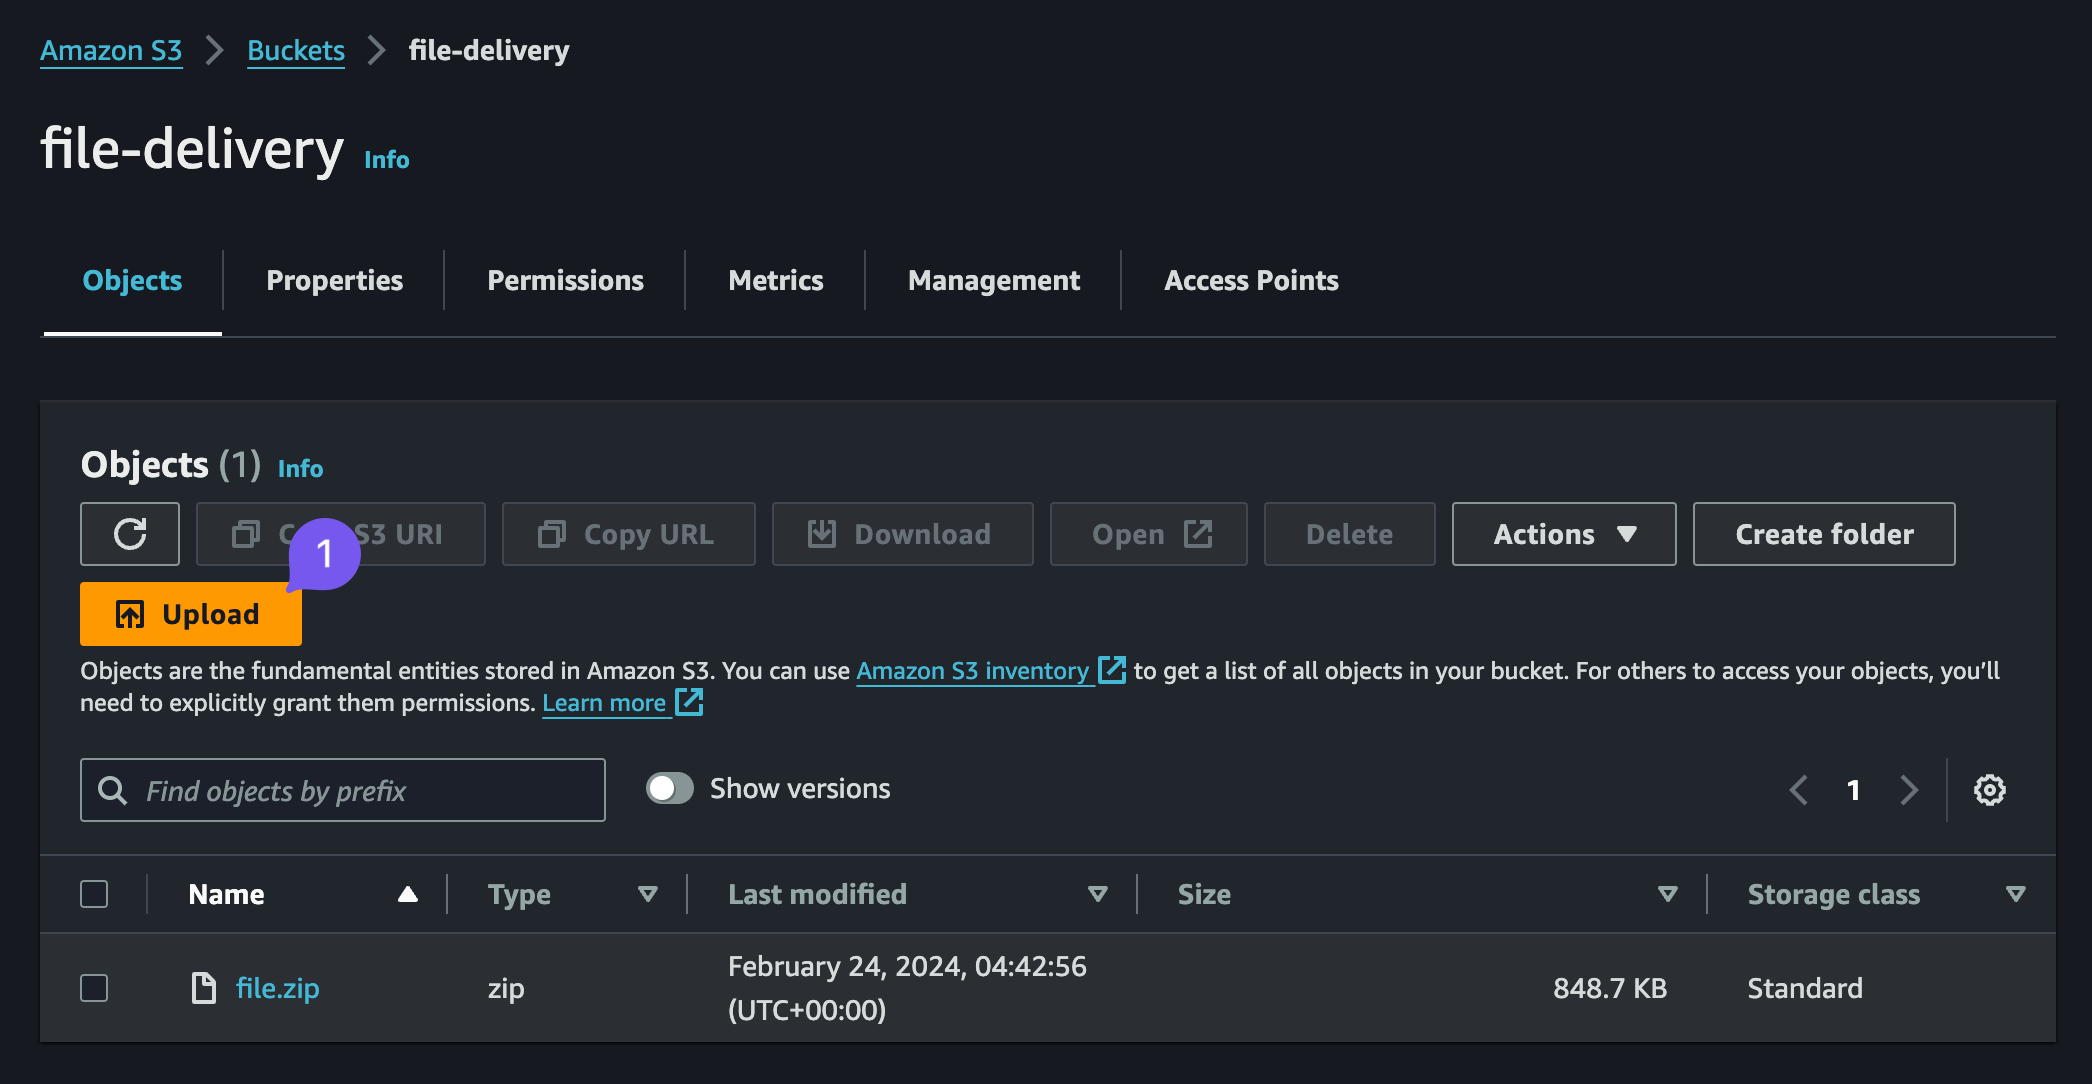
Once created, upload the .zip archive with your files, done, ready to move on. We'll assume moving forward that our file is file-derlivery/file.zip.
Uploading file to the S3 Bucket
IAM User
We want our customers to be able to both download the file right after they purchased it but also download it from their email link within the next 7 days (hard AWS limit). In order to do that, we'll need to set up a standalone IAM user, otherwise the Signed URL will expire within a few hours. Scroll here to learn why if you're curious.
- Navigate to the Users section
- Create a new User, fill out the form:
- Name:
file-delivery - Permissions: skip without selection
- Confirm creation
- View User once it's created and under Permissions tab, go to
Add permissions->Create inline policy. - Within the inline policy, select the S3 service and type in
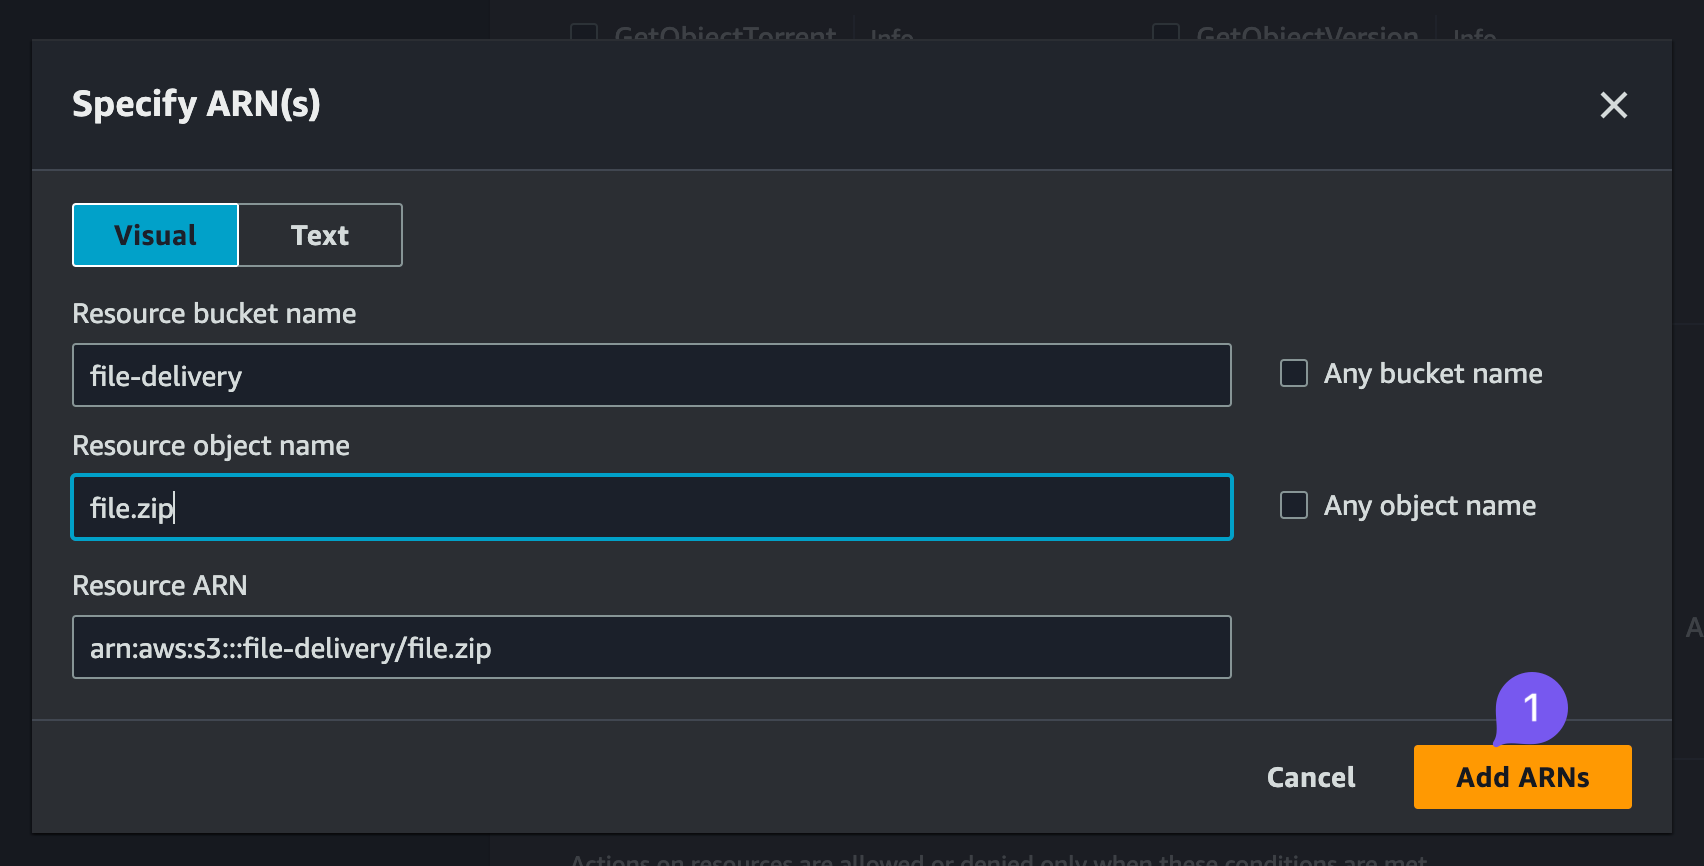
GetObject, select the checkbox with GetObject permission, then specify the ARN. Bucket name -file-deliveryand object name -file.zip, confirm twice - Review the policy, provide a name, say,
file-delivery-policyand finally "Create"
- Name:
At the end of this step, your Permissions tab for the file-delivery user should list a file-delivery-policy containing the following JSON:
{
    "Version": "2012-10-17",
    "Statement": [
        {
            "Sid": "VisualEditor0",
            "Effect": "Allow",
            "Action": "s3:GetObject",
            "Resource": "arn:aws:s3:::file-delivery/file.zip"
        }
    ]
}
Finally, we need to create an Access Key for this user:
- Press "Create access key"
- Select "Application running on an AWS compute service", disregard the alternative recommendation and checkbox that you understand it
- Leave the description tag blank
- Securely store the Access Key and Secret Access Key, press "Done"

Perfect, now we're fully done with both S3 and IAM, halfway there!
S3 User Creation




Lambda
To set up the Lambda itself:
- Navigate to Lambda Functions, create a new one
- Select "from scratch", name it, select
arm64for cheaper execution - Once inside select "add trigger",
API Gatewayand "create a new API", "HTTP API", security - "Open"
Lambda Bucket Setup Images


As you complete these steps we should end up on the following page with our Lambda skeleton ready to go.

We now have to complete the following steps:
- Increase the allocated memory
- Upload the Lambda Code
- Configure the Lambda Environment Variables
- Configure the API Gateway Stage Variables
Once done, our Lambdas and API Gateway (Stages) will be configured to process the requests as we want, grabbing the file from S3, creating a pre-signed URL and
Increasing Lambda's memory
The only configuration change we want to make is set the Memory to 1,769 MB (or whatever AWS requires to get 1 vCPU when you're reading this) since that will massively increase the speed of our Lambda's processing, which will negate most of the cost increase as well:
- Go to Configuration, General Configuration, Edit
- Set the Memory value to
1769, feel free to leave storage at512and timeout at3 sec - Save
Upload the Lambda Code
Download the .zip archive with code for our Lambda. Navigate to the "Code" tab and click "Upload from", .zip file.


Configuring Environment Variables
The code relies on a number of Environment variables which we need to configure. The variable labels are provided below:
| Label | Note |
|---|---|
| S3_ACCESS_KEY_ID | The IAM user Access Key |
| S3_SECRET_ACCESS_KEY | The IAM user Access Secret Key |
| S3_REGION | The region of your S3 bucket. eu-west-2 in this guide |
| bucket_name | The name of S3 bucket with the file, file-delivery in our case |
| object_key | The file's object key, file.zip |
| redirect_host | The url of our confirmation page |
| brevo_api_key | The API Key from Brevo which we'll set up later, leave it as TBD |
| brevo_template_id | The ID of the template in Brevo, by default it's 1 |
| link_expiration | The number of seconds the file will be acessible via the link. Cannot exceed 7 days, which is 604800 seconds |
| fallback_email | An email to send message to in case customer haven't provided their email during checkout |
| support_email | A parameter to show customers if payment confirmation failed to contact |
| email_mode | Whether the code should await email server response and log it. Unless the value is ensure-delivery it will be sent but the answer won't be awaited and logged |
| utm_parameters | Optional UTM parameters to add after the redirect url. Enter &none by default |
To fill in the values:
- Go to Configuration tab
- Expand the Environment Variables sub-tab
- Press "Edit"
- Fill out the dictionary of environment variables
Lambda Environment Variables Images


Note that at the current stage you won't have some of the values to configure this, namely redirect_host, brevo_api_key and bervo_template_id but we can fill them preemptively:
- Redirect host is
https://chapter.devguild.ltd/purchase-confirmed/?download_url=for me and something similar for you, make sure to include thedownload_url=parameter - Brevo API Key can be left as
TBD - Template ID is most likely to be
1if it's your first Brevo template, otherwise - it's sequentially numbered from the Brevo Tempaltes page.
API Gateway
The final part of the AWS setup - the API Gateway. This is how we'll route the customer's browser to our Lambda we've just set up:
- Navigate to Configuration Tab, Triggers sub-tab
- Proceed to the API Gateway URL, in our case,
file-delivery-API - Navigate to Stages in the left navigation menu

Now we'll set up two Stages, or, essentially Routes for our Gateway: test and prod.
We'll create two identical stages, so let's start with a clean slate:
- Go to default, Delete
- Click "Create" in the Stages left menu:
- Name this one
test - Enable automatic deployment
- Leave stage variables and tags empty for now
- Name this one
- Repeat the above for
prodStage - Now, for both
testandprodgo to Stage Variables and create:environmentwithtestandproductionaccordingly
stripe_secret_api_keywith the Test Mode and Live Stripe Secret key which we'll add later, putTBDfor now
Now that we've done it we have everything we need, including the test and prod URLs for our internal APIs, which you can see as InvokeURL which will be the base for the Lambda URLs:
testwithhttps://ldk4dpw362.execute-api.us-east-1.amazonaws.com/test/file-delivery?session_id={CHECKOUT_SESSION_ID}as the valueprodwithhttps://ldk4dpw362.execute-api.us-east-1.amazonaws.com/prod/file-delivery?session_id={CHECKOUT_SESSION_ID}as the value
ldk4dpw362.execute-api.us-east-1 part is unique to you and will be in your API Gateway InvokeURL field, the one that I blur out on my screenshots.Gateway Settings Images


Recap
To recap what we just did:
- We set up a single S3 bucket and IAM user with persistent access to it
- We configured the Lambda's memory and uploaded the code to redirect the user's browser and send the email
- We have configured the Lambda's Environment variables
- Finally, we have configured the API Gateway with two routes:
testandprodwhich we'll use with Stripe and Brevo and our Static Site to test whether everything was set up correctly.
Now that all of the above is achieved we can set up the other three important elements: Brevo, Stripe and the Static Site.
Brevo
Brevo allows us to send up to 300 daily emails for free, has an excellent API and templating. Steps here are easy:
- Create a Brevo Account (affiliate link)
- Complete the setup: verify your domain, configure your senders
- Generate a new API key

Once done, you'll have a key that looks like this: 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. Securely note down it down and proceed.
Create a Template
Since we'll be sending like-for-like transactional emails why not make them look well and use Brevo's.
- Navigate to Templates in Brevo
- Create a new Template, fill out the form. If you're using a noreply email, expand the "Show Advanced Options" and fill out the Reply-To Email address
- Proceed to the Design tab, select the Template you like, we'll go with "Sell a Product"
- Customise the template the way you want, when creating a Link button, make sure to change the
Link targetfield to{{params.download_url}} - Optionally, if you want to hide Brevo's logo (which usually requires a paid plan), you can delete the entire bottom Footer section after dragging out elements from it and applying the background to them individually, deleting the Footer
Brave Template Setup Images


Update the Environment Variables
Now that we have two key variables we want to go back to the Lambda and complete the brevo_template_id and brevo_api_key variables with the ones we've obtained just now.
Stripe
Naturally, we'll need Stripe. Similar approach as Brevo:
- Create a Stripe account
- Complete the setup
- Go to the Test API Keys, reveal, copy and securely note down the test secret key then do the same with the production one.

The key will looks something like this: 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
Payment Link
We will start with a Stripe Payment Link creation as the entry into our checkout flow.
- Switch over to Test Mode
- Create a new Payment Link
- Configure the Product tab however you like
- On the After Payment tab select
Dont't show confirmation pageand paste the URL from the Lambda Trigger, something likehttps://ldk4dpw362.execute-api.us-east-1.amazonaws.com/test/file-delivery?session_id={CHECKOUT_SESSION_ID}, pasting the Trigger URL from Lambda and adding the Stripe Session ID
Make sure to create a Live Payment Link with the similar settings, but replace the route's /test part with /prod, see the API endpoint value in your Configuration -> Triggers menu.

Stripe Payment Link Setup Images


That's all of the setup we'll need to do on Stripe's side, honest.
Update the Stage Variables
We have obtained the only Stage Variable that we now need to insert into the API Gateway Stage (Route) configurations for both Test and Live: stripe_secret_api_key. Replace TBD with the values obtained.
Static Site
We will need to add two elements on two pages on our static site which, I assume, you have for your product or site.
- Our main page or pages for the button with the payment link
- A standalone Confirmation page with a script that would find the
download_urlURL query parameter and initiate the download
<a href="https://buy.stripe.com/%your-link-here%">
  Buy my file for $42.42
</a>
Code snippet to be inserted into the header.
<script>
    document.addEventListener('DOMContentLoaded', function() {
        // Get the download_url parameter from the URL
        var urlParams = new URLSearchParams(window.location.search);
        var download_url = urlParams.get('download_url');

        if (download_url) {
            // Replace the href of the link
            var linkElement = document.querySelector('#your-theme-download-should-start-now-if-it-doesnt-in-5-seconds-follow-this-link a');
            if (linkElement) {
                linkElement.href = download_url;
            }

            // Trigger the download
            var downloadElement = document.createElement('a');
            downloadElement.href = download_url;
            downloadElement.download = '';
            downloadElement.style.display = 'none';
            downloadElement.click();
        }
    });
</script>
Code snippet to be inserted into the Confirmation page.
Now that we have our static site ready we can test.
Going live
Putting it together
Congratulations, you've done it. You can run a full flow in Test Mode, and, assuming you did everything correctly, you'll witness the same thing you did when you watched the video at the top of the page:
- Go to your Static Page that has the button or otherwise navigate to your Stripe Payment Link from Test Mode, for me it's
https://buy.stripe.com/test_somethingorrather - Once there, enter your own email address, a card with number
4242 4242 4242 4242, expiration any time in the future i.e.12/30and any CVV, i.e.123. - Enter any name and valid address, check any box required
- Wait for the payment to process, and after the checkmark wait another 2-3 seconds for everything on our end to fire and finish
- Observe you being redirected to your Confirmation static page and a file download starting
Going live
Now you can replace the URL in your buttons and other various assets on your Static Site with the Stripe Live Payment Link URL.
That Payment Link URL also should have the Redirect customers to your website option enabled and configured to point to your Lambda API endpoint, but with /prod, so something like https://ldk4dpw362.execute-api.us-east-1.amazonaws.com/prod/file-delivery?session_id={CHECKOUT_SESSION_ID}
Ideally that's the only thing you need to do, as everything else is controlled via variables.
Debugging
There are many places where things can go wrong, but I'll equip you with tools to debug the most important ones:
- AWS Lambda - if you want to see the logs of your Lambda running, go to the Monitor tab and from there go to
View Cloudwatch Logs. This tab will show you "log streams" or, essentially, the calls that your Lambda processed as well as any logs you put in there usingconsole.log- `This is where you want to look if your emails are having issues as well as any errors will be logged in there
- If you don't see anything in the Cloudwatch, find your
API endpointand try calling it from your browser, taking a realsession_idfrom Stripe Test Mode, you can find them in the Workbench by pressing~in the Stripe Interface. This will allow you to confirm that your Gateway is routing requests correctly to the Lambda
With these two tools you should be good to go for most issues. Just make sure to fully test the entire flow, including email generation and link lifespan before moving to Live. And don't share your Test credentials if you decided to ship your real files from there as anyone would be able to "buy" them with the 4242 card.
Notes & Issues
Performance
With AWS Lambda we will usually have two performance scenarios:
- Cold start, where the Lambda would have to first initialise and then start processing the request
- Warm start, where the environment is already set up and some things are cached
As of version 1.2.0, the cold start is a sub-750ms: 450ms for initialisation and 300ms for running. Hot start is 200ms thanks to caching.
This means that for the user, especially if the Lambda is already "warm", the delay after Stripe Payment Link processing is almost unperceetable in most cases.
If you want, you can keep a Lambda awlways "warm" (get a server at that point?) but about $10/month.
email_mode is NOT set to ensure-delivery. If that environment variable is present, the time will increase by 120-150ms on average, for both cold and hot starts.Changing linked variables
In this setup we have a few dependencies that might be not entirely obvious. I'll document them now:
- The IAM User Permission policy specifies both the Bucket and the ARN explicitly, meaning if you change the
bucket_nameandobject_keywithout changing the IAM permissions the code would stop working.
You're entirely free to allow unrestricted access to all bucket or even the entirety of S3, albeit, I would not recommend doing that. - The API Gateway stage names and API Endpoints are connected since the Gateway Stage
InvokeURLis what's responsible for the part of the Lambda path. Same applies to the Lambda name itself.
If you were to change any of those you'll need to update your Stripe Payment Link redirect.
Stage vs Environment Variables
Whilst I have put most of the things into Environment Variables it could make perfect sense to store some of them in the Stage Variables, namely:
bucket_nameandobject_key. Storing them away would allow you to ship different files in test environment, making it impossible for someone to "buy" them with4242card- The
S3_ACCESS_KEY_IDandS3_SECRET_ACCESS_KEYcan also be moved into Stage Variables, especially if you want to already move bucket and object variables, since then it's likely you want to maintain two IAM users, one for test and the other one for production. - Technically both the
brevo_api_keyandbrevo_template_idcan be moved to Stage in case you would want to use different accounts, different keys on account or different templates - Same is true for the
link_expirationas well as support and fallback emails, and even theredirect_host, all of that that really depends on your use case.
The provided token is malformed or otherwise invalid
If you're seeing this error when accessing your S3 Signed URLs you might be wondering why it occurs.
This is due to the nature of Lambda-based IAM credentials. They are rotated every hour or so, meaning that even if you have set the link_expiration to, say, a month, the link would stop working as soon as the rotation would occur. This is the reason why we're creating a standalone IAM user with S3 access policy.
A telltale sign of your links being misconfigured and relying upon "rotating" tokens is the URL itself. If it has an X-AMZ-SECURITY segment it's not going to live to see the next day. This is likely fixed by providing the S3_ACCESS_KEY_ID and S3_SECRET_ACCESS_KEY variables or setting up the role if you didn't in the first place
Security through Obscurity
It's important to understand that no file delivered is ever truly secured. Once someone, even one person, has downloaded it - they can share it with their friends, both offline and online.
Therefore, there's a point of not making too much fuss over this entire AWS-Gateway-Lambda thingy and just inserting a fixed redirect with a fixed file uploaded to, say, S3 or online file hosting of your choice.
To do that you would go to the Stripe Payment Link and in the redirect field put something like https://chapter.devguild.ltd/purchase-confirmed/?download_url=https%3A%2F%2Ffile-delivery.s3.amazonaws.com%2Ffile.zip and do note that the download_url part has to be URL Encoded.
Just don't forget to actually go to the S3 Bucket and untick the Block all access box, and then go to the file and set in the Access control list (ACL) the Read opposite to Everyone (public access).
You might want to further change the name of the .zip file to make it less predictable. Just saying.
Bucket and File Public Access Images


Acknowledgements
- Mykhailo Matviiv for performance suggestions for version 1.2.0
- SenseDeep's blog on firing non-blocking http requests on Lambda


Member discussion